Showing posts with label fruit cake. Show all posts

Friday, 17 October 2014

Teddy Bears Picnic Cake

For my dad's birthday this year I decided to use my recently learnt modelling skills. I made him a teddy bears picnic scene with a grandad, grandma and Amelia. Mum, who ordered the cake, asked that I made a light fruit cake so I made an 8" cake and covered this in marzipan and sugar paste. 

I edged the cake with "grass" which I cut out of sugar paste and stuck around the outside in a 3d effect. I made a rug and also draped over the top of the cake in a 3d effect. On top of this rug I carefully modelled the bears and stuck them down. I needed them to have some food to eat so I made a chocolate cake, bread and some carrot sticks, in an attempt to be healthy!! Each bear was eating a different piece of food with grandad eating the cake of course. 
Picnic Food
The final step to the cake was to place flowers around the cake, they were placed side and top. These were simple blossoms that were cut out using a plunger. 
Teddy bears in the field
Final Cake
Overall I was happy with this cake and my dad thought it was lovely which is all that mattered. It was nice to have a different cake in my portfolio. 

Friday, 28 March 2014

My Birthday Cake

For my birthday cake this year, yes I made my own birthday cake, I decided to make my first royal iced cake. This was a whole new challenge to me as I've only recently been introduced to royal icing to be piped let alone to cover the whole cake. However, I had a marzipaned fruit cake and decided to give it a shot. 

I made up a batch of royal icing, breaking my mixer in the process, using meriwhite, icing sugar and water. The first batch of icing was too stiff and not whisked enough, I learnt this in later attempts, so it didn't stick or smooth particularly well. I used this as the first layer and smoothed it all down. After putting on several layers and managing to get better layers of icing, I decided the cake was as smooth as it was going to get. I've learn a lot just from this one cake so I would hope that my next cake will be loads better. I've learnt more about the consistency of the icing, what it should be and I've also learnt that royal iced cakes can not be rushed and require lots of drying time. It took 3 days to cover this cake. 

This type of cake will be a good blank canvas for my future sugar flowers, I can't wait to start my PME diploma in April, but for now I had to make do with my small skills. I made a couple of roses, using different size cutters so that I had different rose sizes. I was mostly happy with my roses but I really want these to improve and expect to get many more hints and tips after my course. Watch this space!! 
Rose Cake
I also used a cutter and imprinter to produce some smaller flowers to create some contrast and colour for the cake. 
Flowers down the side of the cake.
Overall I was reasonable happy with the cake. As I said I've learnt a lot from this cake and would love the opportunity to make another one in a few months. The layers of icing were quite even and the cake tasted really good, even my sister ate it (she doesn't like cake!). 
Sliced Cake. 

Friday, 27 December 2013

Christmas Cake

The second half of the winter term on my sugarcraft course was taken up with designing and creating our Christmas cakes. We were to use patchwork cutters to create designs on the top so the first week we needed to decide what we were going to do. After much consideration I decided to create a robin and some snowdrops. 

The first step was to make the Christmas cake, I used Delia's Smiths recipe but I replaced the booze with orange juice. This worked perfectly well and the cake has lasted many weeks (mid october to Christmas). 

We covered the cake with marzipan, this was slightly more complex than I would imagine but wasn't tricky. We firstly coated the cake in heated apricot jam. We then rolled out a sausage of marzipan and stuck this around the top rim of the cake. Turned the cake over and pressed it into the board. This created a seal for the cake and held it firstly to the board. Once it was in place any air holes were filled with pieces of marzipan, I didn't have any so this wasn't necessary, and then the cake was coated with one piece around 5mm thick. The cake was then left to dry for a week. 

The following week we coated our cakes in sugarpaste. I decided to coat mine in a pale blue icing so coloured it slightly, rolled it to the correct size and stuck it on top. We used vodka to stick the icing on top of the marzipan, this is partly because it's sticky but it's also sterile and preservative. 

Iced Cake
By adding a small amount of water to the sugar paste we could create some piping icing and using this we could create an edge to the cake using a star nozzle. 
Piping around the edge
For the topping of the cake I used 2 patchwork cutters. The first was a snow drop cutter. 
Patchwork Cutter
This created flowers in several layers. The first was plain white. 
White layer for the bottom
Then I needed several layers of green to stick on top in various places. I cut out whole flowers but I only used part of these. 
Here you can see that I've cut off the flowers and just left the stems and leave. 
Green bottom layer
I wanted several layers of leaves so here are those cut out. 
Cutting out the green layers
Once the pieces are all cut out it's assembled and layered up. I made 3 layers of the flowers and so the whole effect was 3D. 
Finished flower
You can see that here. 
Side 3D view
I made several flowers for the top of the cake. 
Several Snow drops
Using the same idea I created a 3D robin. Once all the pieces were ready I made some snow by using some white royal icing and dabbing it on the top. Also using the royal icing I stuck the items on the top. 
Top View with the objects stuck on
Finally for the edges I made some plaques using an oval cutter and a smaller snowdrop stamp. I just marked it out on the icing, these were too small and fiddly to cut out just the flower. I then painted these so they were slightly green. 
Oval Plaques
This is the finished cake. 
Top View, Finished Cake
Side View, finished cake
Overall I thought the cake looked good and tasted nice. I could have done with smaller oval cutters for the plaques on the side as these were too large and had to be cut off. I am still not sure whether I like them either, I only made them because my course tutor insisted. The effect of the top was good and I liked how the cake looked. It's a fairly simple but effective idea. Next year I'll probably use some of the techniques I learnt this year on my cake(s) but will have to come up with some different designs. I'll probably end up making several cakes for various different gatherings. 

If you need a cake for any occasion, including Christmas, please get in touch and I'd be delighted to see what I can create for you. 

Monday, 16 December 2013

Vinyl Record Player

I was asked to make a Vinyl Record Player cake for someone's 50th Birthday this week. He wanted a light fruit sponge so I used the recipe found here. I doubled this recipe to create a 9" square cake. 

Once the cake was baked I covered it in ivory icing and set about decorating and creating the player. To do this I used to more ivory and cut a circle (for the record) and then cut a thin black circle and placed this on top. Cutting a smaller red circle I created the centre of the vinyl and then used a small piece of silver and made the centre pin. 

For the arm I used black icing and made a sausage around a wooden skewer, it needed something to hold it's shape otherwise it would have collapsed. I thin used cocktail sticks both ends to attach it to the cake and hold it in place, these were also wrapped in black icing. 

Finally I used icing to create a few key features on the cake like the buttons on the front. 
All the details.
The final step was to pipe on the record, I did this using white royal icing. 
Finished cake

Finished cake
Overall I was pleased with the cake, it looked effective and it was clear what it was meant to be. However, I thought it was a little simple but I didn't know what else to add to it. I was working from images on the internet and most players do seem to be very simple. I didn't want to create the bell or anything like that but I thought it should have something on it. 

If you'd like to have a cake for any occasion please get in touch. We can discuss flavours and styles and I can work towards you're budget. At present I'm creating cakes for the cost of ingredients (December 2013) but I'm anticipating this changing in the next 6 months or so, so please order now if you need a cake. 

Wednesday, 9 October 2013

Mud Room and Garden Cake

For my dad's cake this year I decided to create something that has been talked about a fair bit recently.. a mud room/utility room which leads from the garden to the kitchen. My dad likes fruit cake so we decided to make a light fruit sponge, this is the recipe we used for our wedding cake. 

I doubled the recipe and used my new multisized tin. 
The hardest thing was choosing the size!!
I was really happy with the bake on this cake
Good bake on the cake
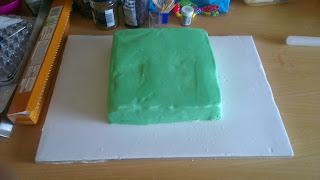
I left the cake to cool and then covered it in butter icing. Using all my new tools I created the smoothest finish I could on the cake. Left it to chill and then covered the cake in green sugar paste icing. 
Covered cake
It was a slightly rough finish because the butter icing was a little hard underneath. This smooth over once it reached room temperature. 

The next step was creating the design. Using sugar paste I broke it down and made it piece by piece. I made cupboards for the kitchen, a washing machine (or washer/dryer) for the utility room. I then made a little chair and boots for dad. Finally I wanted to make my cake more of an autumn theme so I placed a tree in the garden and created some leaves on the grass. I scattered a few around to show how they blow around. 

Kitchen and utility room up close
Tree and leaves
I wanted to show dad in the garden so I decided to create my first ever character, loosely based on my dad. I've never tried to make people before so this was a challenge. I was fairly pleased with my finished product, the eyes could have been better and I think the legs could have done with being longer as he's a little out of proportion. 

Finally I made up some royal icing and piped the words on the board.
Finished cake

Alternative view of the cake
I was pleased with the final product. Still not perfect but I'm getting much better. I'm sure my dad will like it and that's the most important thing. 

If you'd like to order a cake I'm currently doing them for the price of the ingredients (October 2013). Please get in touch with your ideas. 

Friday, 5 April 2013

Fruity Teacake

I like fruit cake but I also find it quite heavy so I wanted a lighter, easier solution to this. I found this recipe on the BBC Good Food website for Fruit Teacake. This is cooked as a loaf rather than a round cake, meaning I could slice it more neatly into pieces. 

The first step was to soak the dried fruit in tea, the recipe states this should be for at least 4 hrs but preferably overnight. Unfortunately I didn't see this until we started to make it so we left it for 3-4 hours during the day. The fruit really plumped up and absorbed all the tea making it them lovely and moist. 


Once the fruit was ready I mixed together the spread and sugar until they were light and fluffy. I then added the egg and flour mixing until the mixture was light and fluffy. The mixture was quite dry at this point. I then added the fruit mixture and mixed it in, this made the cake a much lighter mixture. 

The mixture was then placed in a lined loaf tin, sprinkled with demerera sugar and baked in the oven, the recipe states for 1 hour, however, we left it in for a futher 30-45mins and still the knife was coming out dirty. I decided that we would just have to leave it and risk it. I left the cake to cool. 
Cake fresh out of the oven
To serve the cake I sliced the loaf up and then cut these in half, arranged them on a cake stand. 
Cake sliced and ready to eat.
Verdict: I really liked this cake, I found it very moist and fruity. It probably could have done with a little longer in the oven, so next time I'd leave it for even longer. I've decided to give the cake 9/10. I don't know whether baking it for a bit longer would dry out the cake but it would be worth trying it out. Gary says the cake is nice and fruity, he likes the sugar on the top with the extra crunch. He gives it 8/10 saying the fruit cake is pretty good.