Showing posts with label raspberry. Show all posts

Sunday, 2 February 2014

Flower Chain Cake

I wanted to make a birthday cake for my mother in law. After looking through the latest edition of the cake decoration magazine I got the idea to make a butterfly and flower chain cake. I decided to make 2 raspberry cakes with raspberry italian merringue buttercream icing. I made an 8 inch cake and a 6 inch cake:
Ready to go in the oven
Ingredients:
350g Butter
350g Caster Sugar
350g Self Raising flower
6 Eggs
100g Raspberries
Beautifully baked and cooling
Once the cakes were baked I cut them in half and filled the centre with the buttercream. I then coated the cakes in the buttercream and left it to harden slightly. 

Once ready I covered the cakes in white sugar paste, placed on thin cards and then placed on top of each other. 

Using royal icing I piped a snail trail around the edge of each cake to cover up the join. 

Using petal paste I coloured to pale pink, darker pink and purple. I then used some flower cutters and made 225 flowers in total. These were all rolled on a foam mat and left to dry. I also made 18 butterflies, folded these and left them to dry in shape. 
225 Flowers
Once everything is ready I marked chains around the outside of the cake and stuck the flowers on in random patterns along the line using royal icing. I also piped a dot in the centre of each flower. I stuck the butterflies in each gap and then pushed the wires in the centre of the top cake. Using a few more flowers the wire entry is covered up and a centre piece is created. 
Finished Cake

The top

Side View

Side view
Overall I was happy with this cake and it looks lovely. It's not perfect and is a little lopsided, however, if I was to make this again it would certainly be better and the basic idea is very good. 

If you're looking for a cake for any occasion please get in touch. I can make cakes to your budget and am currently making them for just the price of the ingredients (February 2014) but this will only be for a few more month. 

Thursday, 30 May 2013

"Best Ever Chocolate Raspberry Brownies"

I couldn't wait until the weekend to get back into baking, the ingredients were tempting me in the cupboard, so I decided that Gary can always buy more chocolate and I should do a trial run!! So the recipe I decided to do was Chocolate Raspberry Brownies from the May 2012 BBC Good Food Magazine which can also be found online here

I'm not usually overly successful with brownies, I either over cook them and end up with solid masses or I under cook and they are just raw. I was determined that this time it would all work out and followed the recipe very carefully. 

First step was to melt the chocolate, butter (as usual I used cheapy soft spread) and sugar together in a saucepan. This step was rather interesting for me as I didn't realise how much mixture there was going to be and so it was bulging out of the pan, however, once it had melted it was much better. This mixture produced a lovely rich mixture, yummy!! 
Melted chocolate, butter and sugar ready to add the eggs to. 
I then transferred this mixture to my mixer and added 1 egg at a time. The first egg may have missed the bowl slightly so my recipe had slightly less than the required 4 eggs. 

I then added in the flour and cocoa and finally added in half the raspberries. I used frozen raspberries for this recipe as they are much cheaper and they worked perfectly well. 

I lined a tin with greaseproof paper,
Lined tin
 poured in the mixture and then sprinkled the remaining raspberries on the top of the mix and placed in the oven for 45mins (longer than the recipe stated but it still felt too runny so I thought this was necessary). 
Brownie mixture in the oven
The mixture feels so soft when you get it out the oven I was worried it wasn't done enough but I decided to trust it left it to cool. 
Mixture is cooked and cooling
As the mixture cooled it solidified up and I was pleased that when I cut into it there was a lovely gooey mixture inside, just cooked perfectly. 
My yummy piece of brownie (well my second piece maybe!!)
The verdict: I really enjoyed these brownies, I thought they were lovely and rich but that the raspberries brought an extra dimension to a mixture that would otherwise have been far too rich. This is a recipe that I would certainly like to make again as they are delicious. I now have the rest of the tin to eat :) and then I will make a batch for Gary to take to work for Monday. I give them 9/10. Gary gives the brownies 8/10, they were yummy but they could have been more yummy. Ever the insightful response from my husband!!! 

Friday, 18 January 2013

Shuttlecock Cake

As mentioned previously, it's my husband's birthday this weekend so I wanted to make him a birthday cake. He really enjoys badminton so I thought an appropriate theme would be to make a shuttlecock cake.

I had 3 options for the style of the cake:
1) Make a 3D cake in the shape of a shuttle and decorate the whole thing as such.

2) Make a square cake and place a shuttle image on top of the cake, this option gives room for name personalisation etc.

3) Make a square cake and carve out the shape of a 2D shuttle and decorate it as such.

Whilst I think option 1 would look very impressive, it is the mostly likely to go drastically wrong and in my current state a bit too ambitious, so it was between 2 and 3. I decided to go with 3, and make the shape of the shuttle, I think this will be more impressive and more what I'm trying to achieve with this cake.

First step was to make a template of the shape of cake I wanted, this was important so I could find out what size tin I wanted to make it in. I drew this freehand after borrowing a shuttlecock from my husband's supply. 
Paper template of the cake
After this we worked out that I would make a large rectangular cake so used a big roasting tin. For each layer of the cake I decided to use a 4 eggs mix, 200g of each of the other components:
200g SR flour
200g Sugar
200g Marg
4 eggs.
I then melted 100g of white chocolate and stirred this into the mix and also stirred in some halved raspberries, carefully so they wouldn't break up too much. 

This mix was then put into the tin and baked in the oven for around 40mins, 200oC. I had to cook each layer separately, due to tin restrictions, and left each to cool down. 


Using the template I cut out the shape in both layers. 
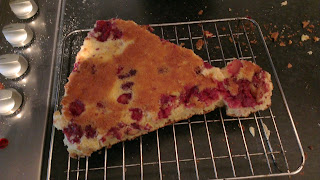
Top layer of the cake, cut and cooling. 
Bottom layer of cake, cut and cooling. 


Once the cake was cooled we made some butter icing to place the two cakes together and also I placed a layer around the outside of the cake. My husband really likes raspberry icing so I made this for him. 
250g Unsalted Butter
500g Icing sugar
Around 150g Raspberries mashed with a fork. 
Cake covered in raspberry butter icing.
We used ready made fondant icing to create the outer layer. I got my mum busy colouring and rolling for me. The first layer needed to contrast the white outer layer, I decided on a grass green colour. Mum mixed in the gel icing colour and rolled it out to cover the outside of the cake. 

Mum hard at work
Green icing is applied to the cake. 
The icing was naughty and stuck to my special mat, so this has resulted in a slightly rough surface and some tears. Next time we will only use cling film as this worked much better for the later layers. 

The next step was to cover the round end of the cake, we decided to colour this a golden yellow, again I got mum to work with this and we carefully placed it on the end. 


Yellow cap is on
Next step was the important step, creating the feathers and the grid pattern. I had two choices, either make them as separate pieces and stick them on or make it as one piece. I decided 1 piece would be better so mum got to work rolling that out. I wasn't sure whether to cut it and then place it on or place and cut, we decided it was less likely to fall apart if we placed it on and then cut it out. 

White icing ready to cut into pattern
Using a feather shuttle as my template I set to work cutting out the pattern freehand. I used a very fine point and marked it out first of all working out where everything would go. Once I'd outlined it I use a sharp knife and my point to carefully extract the spare icing. 

Me concentrating on the design
While I was cutting mum created a band to join the white and yellow icing, again colouring the icing and rolling it out. I then placed this on top and cut it into a strip. 

I used one of my icing tools to carefully mark feathers into the icing by tapping gently and repetitively  Once that was done the cake was finished. I was happy with the end product and, apart from the green icing layer, I don't think I could have done any better. The cake looked like a shuttlecock. We are yet to taste it so I can't comment on that but looks wise very happy. My husband also likes the end product and says he gives the design 9.5/10, which is a high score so I'm happy. Hard work but worth the effort. 
The finished product with my two real shuttles as inspiration. 
The finished product. 

Friday, 7 September 2012

Peppa Pig Pink Cake!!

Today I thought I would try out a new idea and practice some animal making in case I need it in the future. I decided to trial a pink cake with raspberry buttercream and make a little Peppa Pig for the top. 

I made 1 batch of normal sponge mix and then divided it in two. One I left as it was, the other I coloured with a small amount of pink, enough to give it a pink hint but I didn't want a really dark colour. 

The cake batters are coloured and ready to go...

These were then placed in cake tins and baked until lovely and spongey...

Nicely cooked cakes out of the oven

Once out the oven the cake didn't look so pink but you could see the slight colour in it and I hoped that the inside would be stronger. 

I then made the buttercream, as I said I wanted raspberry so I made normal buttercream and then mashed up some raspberries. I originally wants a marble effect through rather than making it so pink but as you'll can see that didn't quite work out but I rather like the finished product. 

Peppa side view
Peppa front view

I then made a Peppa Pig, according to my pictures she has a pink head with a rather large snout and then a red triangle body. It took a while to convince my premade icing that it wanted to be red but in the end it came out a lovely strong colour and a nice contrast to the pink. I made a ball for the head and then shaped it to create the snout. The body I then also formed a ball and shaped this into a more triangle shape. 


I made arms and ears, the arms are attached by cocktail sticks to give them structure and the head is also held on by a stick. I painted on the eyes and marks using another cocktail stick so it's not great but it gives the effect it needs I think. 

Finally I put the cake together. I used the buttercream to sandwich it together and then placed this all over the cake. This won't be what I do when I make the next one but today was just about practice. I then placed Peppa in the middle and decorated the top with the remaining raspberries. 
Top View of the cake

Side view

Front View


I was quite pleased with the finished product but I wanted to check the colouring inside so I cut out a slice to check. I think the result is great, a lovely pink sponge inside and out. 

Colours shown on a slice
A view inside the cake


Overall I need to still work on making Peppa better, I'm not sure she's very recognisable yet and I want to make George and create a whole scene rather than just the characters. I'm pleased with the cake itself, I think the buttercream tastes great but I'm might still try and make a marble effect, it is also a little runny with the extra juice from the raspberries. Not really a worry if this is just for the inside though. I would also like to find some better fondant icing as this isn't perfect, it's a little soft. 


Let me know what you think, there is room for improvement and knowing nothing about Peppa, any comments about her would help.