As mentioned previously, it's my husband's birthday this weekend so I wanted to make him a birthday cake. He really enjoys badminton so I thought an appropriate theme would be to make a shuttlecock cake.
I had 3 options for the style of the cake:
1) Make a 3D cake in the shape of a shuttle and decorate the whole thing as such.
2) Make a square cake and place a shuttle image on top of the cake, this option gives room for name personalisation etc.
3) Make a square cake and carve out the shape of a 2D shuttle and decorate it as such.
Whilst I think option 1 would look very impressive, it is the mostly likely to go drastically wrong and in my current state a bit too ambitious, so it was between 2 and 3. I decided to go with 3, and make the shape of the shuttle, I think this will be more impressive and more what I'm trying to achieve with this cake.
First step was to make a template of the shape of cake I wanted, this was important so I could find out what size tin I wanted to make it in. I drew this freehand after borrowing a shuttlecock from my husband's supply.
 |
| Paper template of the cake |
After this we worked out that I would make a large rectangular cake so used a big roasting tin. For each layer of the cake I decided to use a 4 eggs mix, 200g of each of the other components:
200g SR flour
200g Sugar
200g Marg
4 eggs.
I then melted 100g of white chocolate and stirred this into the mix and also stirred in some halved raspberries, carefully so they wouldn't break up too much.
This mix was then put into the tin and baked in the oven for around 40mins, 200oC. I had to cook each layer separately, due to tin restrictions, and left each to cool down.
Using the template I cut out the shape in both layers.
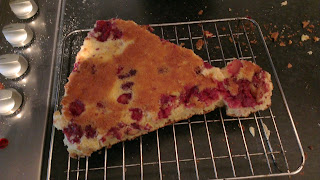 |
| Top layer of the cake, cut and cooling. |
 |
| Bottom layer of cake, cut and cooling. |
Once the cake was cooled we made some butter icing to place the two cakes together and also I placed a layer around the outside of the cake. My husband really likes raspberry icing so I made this for him.
250g Unsalted Butter
500g Icing sugar
Around 150g Raspberries mashed with a fork.
 |
| Cake covered in raspberry butter icing. |
We used ready made fondant icing to create the outer layer. I got my mum busy colouring and rolling for me. The first layer needed to contrast the white outer layer, I decided on a grass green colour. Mum mixed in the gel icing colour and rolled it out to cover the outside of the cake.
 |
| Mum hard at work |
 |
| Green icing is applied to the cake. |
The icing was naughty and stuck to my special mat, so this has resulted in a slightly rough surface and some tears. Next time we will only use cling film as this worked much better for the later layers.
The next step was to cover the round end of the cake, we decided to colour this a golden yellow, again I got mum to work with this and we carefully placed it on the end.
 |
| Yellow cap is on |
Next step was the important step, creating the feathers and the grid pattern. I had two choices, either make them as separate pieces and stick them on or make it as one piece. I decided 1 piece would be better so mum got to work rolling that out. I wasn't sure whether to cut it and then place it on or place and cut, we decided it was less likely to fall apart if we placed it on and then cut it out.
 |
| White icing ready to cut into pattern |
Using a feather shuttle as my template I set to work cutting out the pattern freehand. I used a very fine point and marked it out first of all working out where everything would go. Once I'd outlined it I use a sharp knife and my point to carefully extract the spare icing.
 |
| Me concentrating on the design |
While I was cutting mum created a band to join the white and yellow icing, again colouring the icing and rolling it out. I then placed this on top and cut it into a strip.
I used one of my icing tools to carefully mark feathers into the icing by tapping gently and repetitively Once that was done the cake was finished. I was happy with the end product and, apart from the green icing layer, I don't think I could have done any better. The cake looked like a shuttlecock. We are yet to taste it so I can't comment on that but looks wise very happy. My husband also likes the end product and says he gives the design 9.5/10, which is a high score so I'm happy. Hard work but worth the effort.
 |
| The finished product with my two real shuttles as inspiration. |
 |
| The finished product. |


