Showing posts with label how to make. Show all posts

Friday, 27 December 2013

Christmas Cake

The second half of the winter term on my sugarcraft course was taken up with designing and creating our Christmas cakes. We were to use patchwork cutters to create designs on the top so the first week we needed to decide what we were going to do. After much consideration I decided to create a robin and some snowdrops. 

The first step was to make the Christmas cake, I used Delia's Smiths recipe but I replaced the booze with orange juice. This worked perfectly well and the cake has lasted many weeks (mid october to Christmas). 

We covered the cake with marzipan, this was slightly more complex than I would imagine but wasn't tricky. We firstly coated the cake in heated apricot jam. We then rolled out a sausage of marzipan and stuck this around the top rim of the cake. Turned the cake over and pressed it into the board. This created a seal for the cake and held it firstly to the board. Once it was in place any air holes were filled with pieces of marzipan, I didn't have any so this wasn't necessary, and then the cake was coated with one piece around 5mm thick. The cake was then left to dry for a week. 

The following week we coated our cakes in sugarpaste. I decided to coat mine in a pale blue icing so coloured it slightly, rolled it to the correct size and stuck it on top. We used vodka to stick the icing on top of the marzipan, this is partly because it's sticky but it's also sterile and preservative. 

Iced Cake
By adding a small amount of water to the sugar paste we could create some piping icing and using this we could create an edge to the cake using a star nozzle. 
Piping around the edge
For the topping of the cake I used 2 patchwork cutters. The first was a snow drop cutter. 
Patchwork Cutter
This created flowers in several layers. The first was plain white. 
White layer for the bottom
Then I needed several layers of green to stick on top in various places. I cut out whole flowers but I only used part of these. 
Here you can see that I've cut off the flowers and just left the stems and leave. 
Green bottom layer
I wanted several layers of leaves so here are those cut out. 
Cutting out the green layers
Once the pieces are all cut out it's assembled and layered up. I made 3 layers of the flowers and so the whole effect was 3D. 
Finished flower
You can see that here. 
Side 3D view
I made several flowers for the top of the cake. 
Several Snow drops
Using the same idea I created a 3D robin. Once all the pieces were ready I made some snow by using some white royal icing and dabbing it on the top. Also using the royal icing I stuck the items on the top. 
Top View with the objects stuck on
Finally for the edges I made some plaques using an oval cutter and a smaller snowdrop stamp. I just marked it out on the icing, these were too small and fiddly to cut out just the flower. I then painted these so they were slightly green. 
Oval Plaques
This is the finished cake. 
Top View, Finished Cake
Side View, finished cake
Overall I thought the cake looked good and tasted nice. I could have done with smaller oval cutters for the plaques on the side as these were too large and had to be cut off. I am still not sure whether I like them either, I only made them because my course tutor insisted. The effect of the top was good and I liked how the cake looked. It's a fairly simple but effective idea. Next year I'll probably use some of the techniques I learnt this year on my cake(s) but will have to come up with some different designs. I'll probably end up making several cakes for various different gatherings. 

If you need a cake for any occasion, including Christmas, please get in touch and I'd be delighted to see what I can create for you. 

Saturday, 21 December 2013

Mini Chocolate Fondants

Today we went shopping for the last of our Christmas presents, including each others. We weren't really going to give presents... until we went in a fantastic shop in Brighton. It has discounted bits for the house, including the kitchen and the stuff is great prices. There was so much that I could have got in that shop but Gary kept me to a few items, one of these was a mini muffin tin. Earlier in the week I had seen the Hairy Bikers Christmas party and there was a recipe that I wanted to try using this tin, Mini Chocolate Fondants.

It's quite a straightforward recipe which involves mixing together the egg, flour and sugar. Melting the chocolate and butter and then combining the 2. I was surprised that it only used egg whites but I guess this makes for a lighter mixture.

The recipe made 72 mini fondants in my case but according to the website it describes 60, so bonus 12 I got there!! When I got them out the tin I thought they were such cute little sponges. I wanted them to have a soft gooey inside but I think leaving them to cool meant that this firmed up. It was softer just not as gooey as perhaps I would like. Maybe if I cooked them for a bit less time this happen, we'll see next time I try them.

Not got a gooey centre but a little softer
They came out the tin beautifully, which made my life very easy, and I had 2 racks of cooling fondants to tempt Gary with!!
Lots of cooling fondants
The topping is a marscapone, cream and sugar mixture which is divided in half and one half vanilla, one chocolate. I used two piping bags and combined these through a star nozzle to create the half and half look. The first tip I used was too small and struggled to get the mixture through, the second tip I used worked much better. It was much larger and the mixture came through easily.
Finished mini fondants
These little bites are delicious, they are a great little bite and a good size for a party. The topping balances the intensity of the bottom and lightens it nicely providing a little chocolate hit in the chocolatey top. I'm looking forward to making another batch of these soon and experimenting with the timing of the cooking. I hope they are enjoyed by others as much as we enjoyed them.

Monday, 16 December 2013

Vinyl Record Player

I was asked to make a Vinyl Record Player cake for someone's 50th Birthday this week. He wanted a light fruit sponge so I used the recipe found here. I doubled this recipe to create a 9" square cake. 

Once the cake was baked I covered it in ivory icing and set about decorating and creating the player. To do this I used to more ivory and cut a circle (for the record) and then cut a thin black circle and placed this on top. Cutting a smaller red circle I created the centre of the vinyl and then used a small piece of silver and made the centre pin. 

For the arm I used black icing and made a sausage around a wooden skewer, it needed something to hold it's shape otherwise it would have collapsed. I thin used cocktail sticks both ends to attach it to the cake and hold it in place, these were also wrapped in black icing. 

Finally I used icing to create a few key features on the cake like the buttons on the front. 
All the details.
The final step was to pipe on the record, I did this using white royal icing. 
Finished cake

Finished cake
Overall I was pleased with the cake, it looked effective and it was clear what it was meant to be. However, I thought it was a little simple but I didn't know what else to add to it. I was working from images on the internet and most players do seem to be very simple. I didn't want to create the bell or anything like that but I thought it should have something on it. 

If you'd like to have a cake for any occasion please get in touch. We can discuss flavours and styles and I can work towards you're budget. At present I'm creating cakes for the cost of ingredients (December 2013) but I'm anticipating this changing in the next 6 months or so, so please order now if you need a cake. 

Friday, 8 November 2013

Modelling Flowers

We learnt how to model flowers on our sugarcraft course. It's a simple process and requires just the most simple tools. Here's how we did it. 
Roll out some icing in whichever colour you want your flowers. 
Rolled icing
 Using a piping tube cut out 5 circles for each flower. 
5 circles and the ball tool. 
With a ball tool press around 2/3 of the edges thinning them out. 
Shaped petals

Take a small ball of yellow and add some edible glue to it to make it tacky. Pinch one of the circles on the thicker edge and stick this onto the ball. 

1 Petal Attached
 Repeat this with all 5 petals

Petals stuck to centre
Add another ball of yellow to the centre of the flower and prop up the petals with cling film. 

1 flower completed
 Do the same the second flower. 
Both flowers drying
 Remove the cling film and add some leaves to the bottom of the plaque. How to make the leaves can be found in the hedgehog tutorial here
Finished Flowers

Tuesday, 5 November 2013

Galaxy Bar

I was asked to make a chocolate cake in the shape of a galaxy chocolate bar. I used my standard chocolate cake recipe:

325g Butter
325g Plain Chocolate
50ml Coffee
2tsp Vanilla Essence
325g Plain Flour
1tsp baking powder
1tsp bicarbonate
475g Light soft brown sugar
5eggs
284ml Soured Cream

Melt the chocolate and butter together. Add this to the other ingredients and stir it all until the mixture is smooth and mixed together. Pour into a lined cake tin and cooked until the skewer comes out clean. Once the cake was cooled I covered it in chocolate butter icing and chilled in the fridge. 
Smooth butter icing
I had ordered some good quality icing for this cake but unfortunately it hadn't arrived so I had to use the cheaper stuff. I coloured it brown, using a lot of brown paste, and covered the cake in 1 layer. 
Covered cake
I coloured the brown slightly darker, placed a thin layer of white and then the darker brown on top. 
Ready for detailing
Using various shades of brown I cut out the shaping for the bar wrapping. I used the lettering from the wrapper to create the words and finally made a square of chocolate for the top. Using a knife I marked out a few squares of chocolate on the edge of the bar. 
Finished Galaxy Cake
I was pleased with the over all effect of the bar. It would have been better with stronger icing but it still came out very well. I hope the birthday girl liked it. 

If you have any need for a cake please get in touch, for a few more months I'll be making cakes for just the cost of the ingredients (November 2013). 

Saturday, 2 November 2013

Modelling a Hedgehog

This is another model that I learnt how to create on my sugarcraft course was a hedgehog sitting on a pile of leaves. I've created this in a step by step process to show you how to do it. First thing is you need two shades of brown sugarpaste. You'll need more of the darker colour. 
Brown sugarpaste.
Using the lighter brown colour roll it into a ball using the palms of your hands. 
Ball in light brown.
Then pressing into the palm of your hand shape it into a cone and then flatten the back of the cone to form a flat edge. 
Cone
Push up the tip of the cone to shape the nose upwards. 
Cone with a up turned nose. 
Using the darker brown shape it into a ball around double the size of the head.
Dark brown ball
Shape into a oblong. 
Shaped to an oblong.
Using a ball tool press in the head edge and form a indentation that the head can fit into. You want the edges of the body to stick out around the head. 
Indented to fit in the head
 Using edible glue stick the head in the body. 
Stuck together
With a small pair of scisors make cuts all over the body starting from the bottom of the hedgehog and working your way up. These are better if they're random rather than in lines if possible. 
Spikes cut with scissors.
Using a ball tool press indentations for both the eyes and the nose. Roll out a ball in black icing and using the glue stick these into the holes. 
Eyes and nose added
For the leaves roll out some leaf colours, for this example I just used yellow but it's better to use a variety of colours. You can make new shades of colours by mixing small amounts of icing and kneading them together. It also adds to the effect to do different sizes of leaves. In the rolled out icing cut out thin strips. 
Strips for leaves
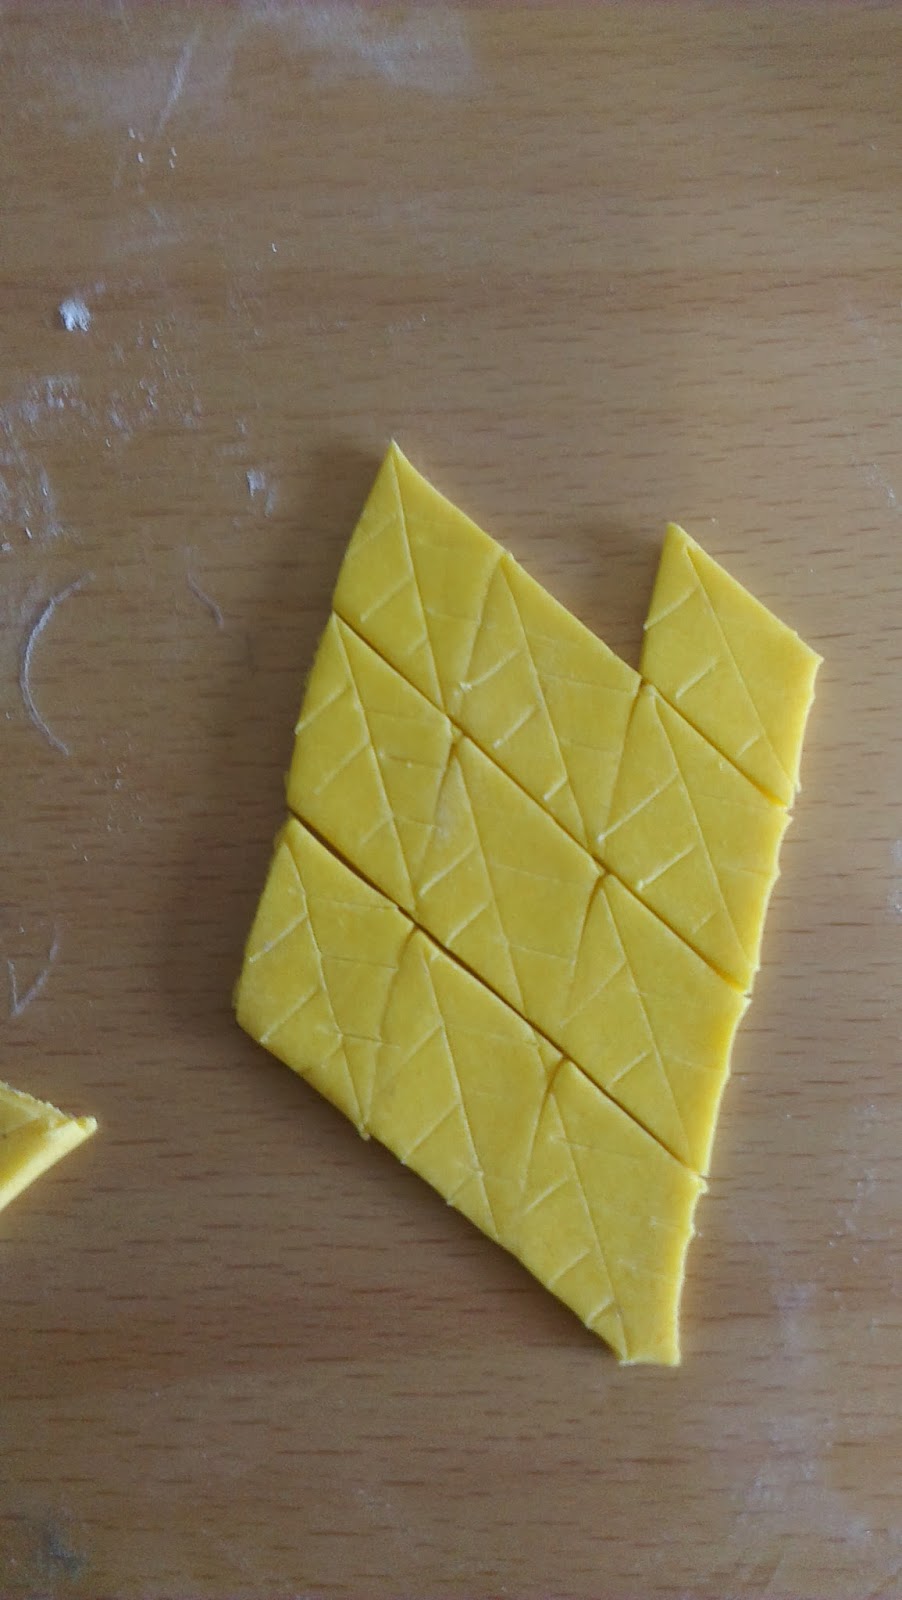
Cut across these with diagonal lines to form diamonds. 
Diamonds.
In the diamonds, using a sharp knife, mark out the leaf lines, there should be one line down the middle and then some lines out from these. Mark all the leaves in the same way. 
Leaf lines
Using glue stick these onto a plaque, don't stick them down flat but stick them folded over and in lots of angles, this makes a much more realistic leaf pile. Finally place the hedgehog on top. 
Finished hedgehogs, left has better leaves but a bit squash from travelling!! 

Thursday, 31 October 2013

Modelling an Owl

I decided to split the last 2 weeks of my sugarcraft course into projects rather writing a post about each week. We learnt how to make some models on plaques one of these was an owl. I've recreated this so I could talk you through step by step process. 
Browns needed for the owl. 
For the first steps of this process you need 3 different shades of brown icing. Start by using the middle shade of brown. Roll it out and then using a cutter cut out a circle. 
Circle cutter.
In this circle cut out a V. Roll this slightly so that it's slightly larger than the gap it came from. 
Larger V than gap.
With the other colours of icing roll them out and cut smaller circles using a piping tube end as the cutter. 
Circles for feathers.
Use edible glue to stick the circles on to the V. Stick 3 of the dark circles along the bottom. 
3 in a row.
Stick 2 above this and then do the same above with the lightest icing. 
Feathers.
Place the rest of the circle on top of the V.
Body stuck on feathers.
Using some yellow icing cut out some rectangles at the bottom of this cut out some triangles. This will form the feet. Stick these on the plaque first. 
Feet
Place the owl on top. Using a piping tube end cut out some white circles and stick these on to form the eyes. Using the middle brown icing form two cones. These are the ears, using a ball tool press out the shaping. 
Ball tool for the ears. 
Stick these on each side of the eyes. 
Ears and eyes stuck on
Using some piping tubes cut out 2 blue circles and 2 black circles. 
Piping tubes used for eyes.
Stick these on in the eyes. Finally using some yellow form a cone and stick this on for the beak. 
Finished owl