Showing posts with label flowers. Show all posts

Monday, 29 December 2014

Looking back at 2014

I've decided to do a little look back at the last year as we're approaching the new one. I'm not sure I can remember back to January 2014 but with the help of photos I intend on having a go!! 
So I think what I'd like to do is go through each month, show the cakes I've created and also put in any news from this month (what I can remembered!!). 

January 2014

January was the first time I really attempted to make any sugar flowers. I spent days practicing the navy roses and still wasn't happy with them. Gary's birthday saw 2 cakes this year as I made one for work and one for home. 


February 2014

In February my parents moved house down to Ashford. This move meant that we were also looking for a new house and I was beginning to think about becoming a business. I made my first tiered cake using a design from a magazine and it remained standing!! 


March 2014

March brought the usual birthday flurry and I made a cake for my sister, brother and myself. I attempted my first wonky cake and my last, haven't yet tried that again but I wasn't too happy with it. March also saw us find our 3rd house (2 had fallen through by this point) which was to eventually become our home. 


April 2014

April saw my just make one cake as we were nearing moving most of my tools were in boxes. 
May 2014

In May we moved house, this meant more space but also it meant that I could finally start seriously thinking about becoming a business. Mini M turned 1 and we were able to have all the family and friends over to celebrate. 

At the end of April/beginning of May I also started my first PME Diploma in Sugar flowers. This was to be the start of my masters, my love of sugar flowers but also the start of cake club and courses at CP. This has become a very useful and almost vital part of my cake decorating. 


June 2014

June I spent most of my time making sugar flowers. I came home each week from my diploma and I practiced and practiced.  Finally I felt that my flowers were looking realistic and reaching a standard I could be proud of. 
July 2014

In July we had our garage converted so I'd have more space to make my cakes. This is officially our dining room but most of the time it's rather over taken with all my cake bits. I completed my sugar flowers diploma and also started an intensive Sugar paste diploma. I spent a lot of time in Maidstone doing lots of courses and barely seeing my husband!! 


August 2014

August was a very busy month. My sister got married so I made a little cake and some cupcakes for her. I was also asked to make a few birthday cakes and finally I finished up the month making some display cakes for wedding fairs that I'd decided to sign up for. 


September 2014

So September was the big month when I officially became a business. I registered to open at the beginning of September because I had another very important first, my first wedding cake!! I attended several wedding fairs in order to get my name out very early on in my business and to attempt to get some orders up for the future. I learnt a lot in this first month of business and I hope to continue to build on this. 


October 2014

 I completed my PME Masters in October my doing the final diploma, Royal icing and piping. I made a couple more display cakes and was honoured to be offered a space in W E Clarke amongst their wedding jewellery. As this years wedding fairs concluded I started to plan and design the cakes for the next year. 

November 2014

As Christmas started to get closer I started to prepare cakes, lovely rich fruit cakes that needed time to mature. I also had a few birthdays including my mum's and nephews. 


December 2014

I attended some Christmas fairs in December partly to advertise but also to try and sell a few bits and pieces. I also joined the Stone Cross market which I'll be attending every other week for the same purpose. I enjoyed making a few different bits at Christmas and next year intend to build on this and get hampers, cakes and puddings out to those that request them. 

Looking at all these photos makes me realise just how busy this year has been on the cake front. I've been in business just 4 months now and I feel like it's starting to spread around. I'd ideally like to get more wedding cakes booked in but I think it'll take time for my name to get around. Please keep spreading it if you have enjoyed my custom and help me to continue in my business venture. I'd love to have a thriving business. I hope you've enjoyed this little trip over the last year and seen how far I've come. I'm looking forward to what next year brings!! 


Monday, 1 September 2014

Cascade Wedding Cake

I needed to make 4 display cakes for the upcoming wedding fairs I'm attending and I decided I needed to try and choose a few different styles. This cake was to showcase my flowers and to be quite luxurious. 

I used 3 tiers of polystrene dummies, 6", 8" and 10",  and covered them in white sugar paste. I trimmed each layer with some purple ribbon to cover the edges and bring a little colour on to the cake. 

I then set about making the flowers, these took me 3 days of work as I made several. I wanted to make a variety so I made Ivy Leaves, Rose Leaves, Roses, Carnations, Freesia and Jasmine. 
Lots of flowers in the making
I then started to make the topper of the cake, so I taped together some of the flowers and placed these in a flower pick on the top. 
Cake topper completed
Next job was the cascade down the side. I started by lining these up on the table in roughly the right arrangement. 
Trail of flowers
And then the biggest challenge was taping this together. I started with the Ivy as the bottom layer and held this against the cake to check it was ok. 
Checking out the Ivy
And then I fitted everything else into this. I built it up flower by flower trying to make sure everything was solid and a strong structure. I did place a couple of flower picks to support the roses as these were really heavy and toppling slightly. Once it was all taped I then attached it to the top and placed it on the cake. 
Cascade attached
I then needed to cover the board at the bottom, place ribbon on the bottom layer and put some flowers on the bottom. These were attached to the board so could only be done last. The final job was to place a few unwired ivy leaves on the cake to cover up the plastic flower picks and finish the cake off nicely. 

Cake all finished. 

Friday, 28 March 2014

My Birthday Cake

For my birthday cake this year, yes I made my own birthday cake, I decided to make my first royal iced cake. This was a whole new challenge to me as I've only recently been introduced to royal icing to be piped let alone to cover the whole cake. However, I had a marzipaned fruit cake and decided to give it a shot. 

I made up a batch of royal icing, breaking my mixer in the process, using meriwhite, icing sugar and water. The first batch of icing was too stiff and not whisked enough, I learnt this in later attempts, so it didn't stick or smooth particularly well. I used this as the first layer and smoothed it all down. After putting on several layers and managing to get better layers of icing, I decided the cake was as smooth as it was going to get. I've learn a lot just from this one cake so I would hope that my next cake will be loads better. I've learnt more about the consistency of the icing, what it should be and I've also learnt that royal iced cakes can not be rushed and require lots of drying time. It took 3 days to cover this cake. 

This type of cake will be a good blank canvas for my future sugar flowers, I can't wait to start my PME diploma in April, but for now I had to make do with my small skills. I made a couple of roses, using different size cutters so that I had different rose sizes. I was mostly happy with my roses but I really want these to improve and expect to get many more hints and tips after my course. Watch this space!! 
Rose Cake
I also used a cutter and imprinter to produce some smaller flowers to create some contrast and colour for the cake. 
Flowers down the side of the cake.
Overall I was reasonable happy with the cake. As I said I've learnt a lot from this cake and would love the opportunity to make another one in a few months. The layers of icing were quite even and the cake tasted really good, even my sister ate it (she doesn't like cake!). 
Sliced Cake. 

Monday, 10 March 2014

Chocolate Flowers Cake

I was asked to make a chocolate cake for someone's birthday this week. After showing her my previous flowers cake she mentioned she liked this so I did something along the same lines. She also mentioned that she liked cherries so I put in a black cherry filling for her. I was given a budget for this one so I had to carefully keep all my ingredients in check and make sure I wasn't designing a cake that was too expensive. The rich chocolate cake recipe is more expensive than normal sponge but also decorating in chocolate can add up very quickly if you buy too many different varieties. 

I used half of my usual rich chocolate recipe:
325g Butter
325g Plain chocolate
325g Plain Flour
50ml Coffee
1tsp Vanilla Essence
1tsp baking powder
1tsp bicarbonate of soda
475g Soft Brown Sugar
5 Eggs
300ml Soured Cream

Melt the chocolate and butter together. Then mix all the ingredients together and bake in the oven for at least 1 hour, until a skewer comes out clean. Leave to cool in the tin before you remove (otherwise it just falls apart). 

I sliced the cake in half and filled with a tin of black cherry filling. This is thicker than the standard black cherries in syrup and holds its shape better in the cake. 

I then coated the whole cake in vanilla butter icing. 250g Butter and 500g Icing Sugar. I made sure this was completely smooth to give a good finish on the cake. 
Iced Cake

Next step was to prepare all the chocolate. Firstly I grated a bar of plain chocolate. Then I halved some of the buttons, minstrels and vice versas. I put these in the fridge so they were really cool and I could handle them without them melting. 
Prepared Chocolate

Firstly I used the grated chocolate for the rim of the cake. I had never tried this before but it was very straightforward to do. I press it all into the butter icing with my hands making sure there were no gaps and it was an even coating. 

Next I created a flower right in the centre of the cake using giant milk chocolate buttons. I first place a white chocolate button right in the centre of the cake and then used this to create the flower using the halved buttons. 

I then created the border on the cake by alternating the vice versas. 

Finally I filled in the remaining space making some flowers with the halved white chocolate buttons, vice versas and minstrels. 
Finished Top View

Finished Side View

Overall I was pleased with this cake and how it looked. Creating cakes like this is very effective and gives a nice finish. My customer seemed very happy with the cake and that's the most important thing. 

Tuesday, 18 February 2014

Sugar Flowers in a Vase

The first half of this half term on my sugar craft course we made a vase filled with sugar flowers. 
Flower Vase
The vase was made using petal paste, rolled and stuck together. It was then left to dry before using royal icing to pipe the pattern on to it. 

The flowers are very simple to make and are a variety of 5 and 6 petaled flowers. These are made without any cutters or tools. I'll try and post a tutorial on these later in the week. They are attached to wire, decorated with powder and then placed in the vase. 
Top view of flowers
The whole vase is very easy to make and only took a few hours to put together. It is very effective and looks good, however, I have no idea what I'd actually use this for!! Anyway I've learnt to make some flowers and my mum has a vase on her new window ledge for the cats to eat. (Our cat eat some of the flowers I made!!). Making these flowers has also made me look forwards to my sugar flower diploma with more excitement. I start this on 29th April and can't wait. I hope that I'll learn some really great skills. The plan is to complete this by July and then start the next diploma in September, final one in January to have obtained my masters by March next year. 

In other news, the location of my new cake business has changed. We are now looking at heading a little further east and will, hopefully, be based in Stone Cross. Hopefully we'll be moving in the coming months and I can finally register as a business and start making a profit. I've had a couple of orders in the past few weeks so hopefully my name is starting to spread. If you know of anyone that wants a cake, for any occasion, then please pass on my details. 


Friday, 8 November 2013

Modelling Flowers

We learnt how to model flowers on our sugarcraft course. It's a simple process and requires just the most simple tools. Here's how we did it. 
Roll out some icing in whichever colour you want your flowers. 
Rolled icing
 Using a piping tube cut out 5 circles for each flower. 
5 circles and the ball tool. 
With a ball tool press around 2/3 of the edges thinning them out. 
Shaped petals

Take a small ball of yellow and add some edible glue to it to make it tacky. Pinch one of the circles on the thicker edge and stick this onto the ball. 

1 Petal Attached
 Repeat this with all 5 petals

Petals stuck to centre
Add another ball of yellow to the centre of the flower and prop up the petals with cling film. 

1 flower completed
 Do the same the second flower. 
Both flowers drying
 Remove the cling film and add some leaves to the bottom of the plaque. How to make the leaves can be found in the hedgehog tutorial here
Finished Flowers

Tuesday, 22 October 2013

Sugarcraft Course Week 3 (I missed week 2)

Before I start the blog post for this week I want to apologise for my absence. I've been really busy lately with splitting my time between London and here and I just haven't had the chance to get everything done. I can't say much more than that but I hope that in the months to come you'll all see why I've been so busy and why this is really exciting for us both personally and also with my new business venture. 

As you know, I've been doing a sugarcraft course at Greenwich community college. This week we learnt how to pipe a basket of flowers on a covered cake board. 
Finished basket
We did this in stages, first step was to cover the board. Very straightforward. Colour your sugarpaste, roll it out and place it on the board. Cut around the edge and smooth it all over. To ensure the paste sticks to the board you can use a touch of water. 

Second step was the challenging part. Piping the basket and flowers. We did this using techniques we'd learnt in the first week. First pipe a large swirl in the centre of the board and a smaller one at the bottom. This forms the top and the bottom of the basket.Draw 2 vertical lines joining the swirls forming the edges of the basket. Between these draw so vertical lines, 3, one in the centre and one either side. Then pipe horizontal lines these need to give the effect of a weave so top line pipe to the second line, stop and then pipe from the other side of that line to the edge. Next row down pipe between the 3 central lines. Then back to piping across the 2 edge lines. Do this all the way down and then fill in the edges. 
Weave on basket

For the handle you want to pipe a large curved line from the edge of each swirl and then lots of little diagonal lines across it. 

Now we're on to the flowers. Start off with drawing some vertical green lines randomly from the basket. These will form the stems of the flowers. Using whatever colour you like pipe 6 spots in a flower formation leaving space in the middle for a yellow dot. These are your flowers, place them randomly over the green stems. Do a variety of colours. Finally for the leaves pipe lots of green spots off the stems and pull slightly as you lift, this gives a leaf shape. 
Flowers and stems
As always there's lots of improvement required but this can only be achieved with practice, which I intend on doing. I forgot to take a picture of the one I created in class so this was a quick replica so I had some photos. Next time I do it I'll try and take step by step photos. 
Next week we're doing modelling, this I will certainly need step by step photos in order to write a blog post. For now though, get practising your piping!! 

Monday, 16 September 2013

Flowers Cake

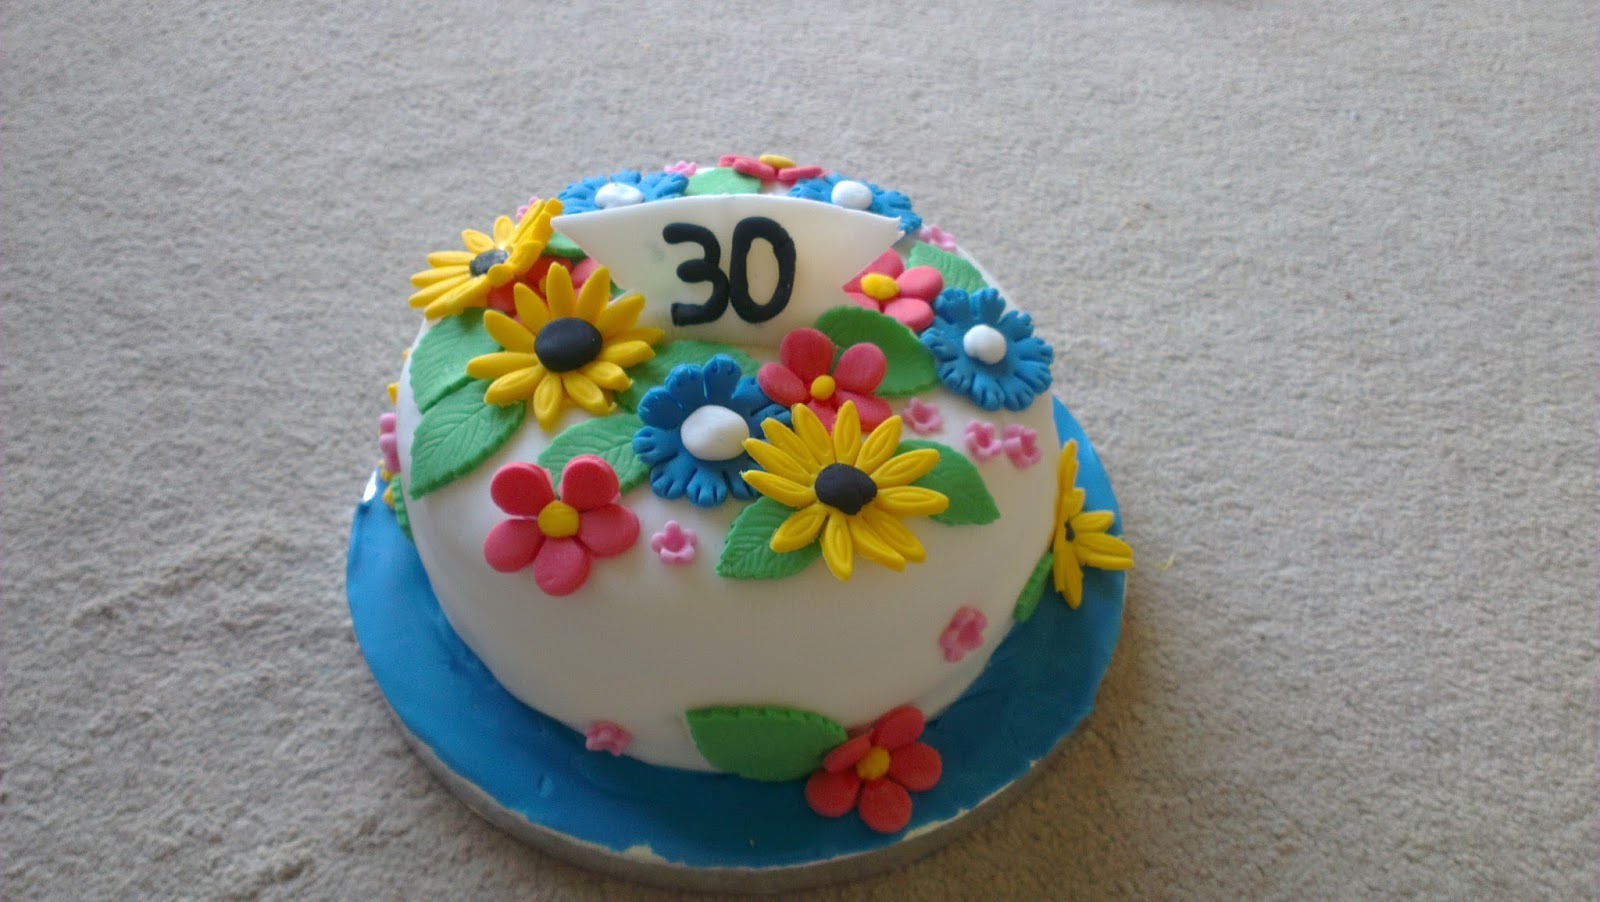
My sister requested a cake from me for a celebration of 30ths, we discussed what she wanted and decided to make a lemon sponge with flowers decorating the top. She only wanted a small cake so I decided to make her a 6" cake. 

Ingredients:
4 Eggs
200g Self Raising Flour
200g Butter
200g Caster Sugar
100ml Lemon Juice

Cream the butter and sugar together until light and fluffy. Add the flour and then the eggs 1 at a time. Mix until it has lightened in colour. Add the lemon juice and stir until mixed together.
Ready to go in the oven
Pour into a prepared cake tin and bake, 150oC for around 1 hour until a skewer comes out clean. Leave to cool on a wire rack. 
Cooling Cake
Make some butter icing by mixing together 250g butter and 500g icing sugar. Add around 30ml of lemon juice. The icing should taste lemony so add till it has a good kick. 

Cover the cake with butter icing and sugar paste as shown here. 

I then decided to cover the cake with lots of different coloured flowers made out of flower paste. This makes the flowers hard and also means they have more of a 3D effect rather than being flat on the cake as they are here

I cut out the flowers using cutters and then left them to dry slightly in bowls, so they dry slightly bent rather than flat. 
Flowers drying in bowls

These were then stuck on using edible glue. I made the leaves in the same way and also the 30 plaque in the middle. I used icing rolled into thin sausages to create the numbering. 

Overall I was fairly happy with the cake. I thought the flowers looked good and is something I would repeat. My cake covering is now improving but could still be better and this cake was created before I learnt those extra skills. I would also cover the board differently next time which would also create a better finish. The cake went down well with the birthday girls and I hope they would consider ordering cakes from me again. 
Finished Cake

If you want to order a cake from me please get in touch. I'm currently making them for the cost of just the ingredients (September 2013), this cake was £10 including box and board. Personalise a cake, do something different. 

Friday, 13 September 2013

Practising Cake Decoration

After creating a flower 30 cake this week I wasn't happy with my cake covering skills and wanted to improve them. At the same time one of the pages I follow on facebook posted a link to some free decorating videos for beginners.. perfect. So I set about studying. The videos can be found here for those interested. 

I had left over icing and flowers so Gary decided that I should make a cake for work so that 1) he gets to try the cake and 2) I could use up the left overs. I also decided it would be a good chance to practice what I'd just discovered. 

I first baked the cake, levelled it off and cut it in half.

I cover my cakes in buttercream in order to stick the sugarpaste onto them. The first step was to make this much smoother so there was a good basis for the icing. I have very limited tools at the moment so it is slightly more challenging but I think I achieved a better finish. First thing was to start with the sides, I usually start with the top and pull it down. The first layer is a "crumb" layer, this is because the cake crumbles as you put on icing and you don't want crumbs to be on the visible layer. I put the cake in the fridge to set, once hard I added a second layer. This was carefully smoothed down, using a table knife so mine had some lovely marks in it!! and the left to set again. Once hard the top edges we cut off so it was smooth on the top and then I placed a layer on the top of the cake. Again this was smoothed down and left to set. The edges were cut off and overall I had a really good finish. This was then put in the fridge. 
Smooth Buttericing
I then prepared the sugarpaste. I already had some slightly silver paste so I decided to use this up. You knead the paste, like bread, always folding over the top so you get a smooth finish on the bottom. Once it's smooth then it's ready, turn it over, fold under the edges and push down a little. I have great problems with my sugarpaste sticking to the surface in my kitchen, it's matt and bumpy, but I noticed in the video he uses a smooth shiny surface so I decided to give the table a try. Usually I use clingfilm and roll onto this but it's a really hassle trying to peel it off and keep shaping etc. This video says to use icing sugar. The sugarpaste is constantly moved around and rolled in icing sugar preventing it from sticking to the surface. Using a icing rolling pin means that it won't stick on the top either and you get a lovely smooth finish on the top surface without icing sugar destroying the look. The icing is always turned 90 degrees but never flipped over so the same side is always table side down. I only have a tiny rolling pin so I used my large wooden one to help me move the paste around. This method worked very well for me and I was very happy with the result. 
Cake covered in Sugarpaste
I then got the cake out the oven and roughly measured how much paste was needed, this was picked up using the rolling pin and carefully placed on top. Start with sticking the top down trying to push out as many air bubbles as possible. The stick the top of the sides down opening out any pleats. Finally the bottom by opening out the pleats pushing down and in to create a smooth finish. Trim off excess paste and then use your hands to smooth it over. Also use a paste smoother to finish up. There may be air bubbles so use a small pin to release these. 

Overall, whilst it was perfect, it was a dramatic improvement on my previous work. I had the difficulty that I did this in a tin so couldn't reach the bottom of the cake properly, so the bottom edge isn't great, but the top looks pretty neat. I need another smoother in order to create a better edge on the cake and I would have preferred to use more butter icing. But generally pretty good. 

I decorated the cake with the remaining flowers by this time they were pretty dry so I couldn't shape them very well. I just stuck them on. 

To make the flowers I decided to try out flower paste, I wouldn't to give this a go because it dries more solid than normal sugarpaste and is meant to be manipulatable. I found it easy to work with but you must keep it away from air when you're not using it. I also tried added gum tragacanth to some icing, as this is meant to be a much cheaper way of achieving the same thing, it worked really nicely. It was easy to knead into the icing and the flowers dried just as hard. Since flower paste is so expensive (4x price of normal sugarpaste) it's definitely an option I would use. I'm looking forward to trying out some modelling with this harden paste to see if I can achieve a good finish. 
Finished cake
If you would like to order a cake, or any baked goods, from me please get in touch. I'm currently doing it for just the cost of ingredients (Sept 2013) while I work on improving my skills. If booked far enough in advance I can travel a little further afield than Sussex. 

Tuesday, 13 August 2013

Pink and Flowery Birthday Cake

This cake was a bit of a last minute decision. We had 2 family birthdays within 2 days of each other and I was originally going to make the cakes the same week, however, a last minute trip to London meant I could do this one a bit earlier. It isn't the most inspiring design but it gave me the chance to practice a few bits and pieces. 

I decided to make a chocolate cake so I used a standard recipe:
200g Self Raising Flour
200g Butter
200g Sugar
4 Eggs

I also added a little baking powder because I didn't use real butter and I now know this makes quite a difference. Once the cake was cooked and cooled I made some butter icing:

250g Butter
500g Icing Sugar

and flavoured it slightly with orange essence. The whole cake was then filled and covered in the icing and placed in the fridge whilst I prepared the rest. 

I decided to decorate the cake with a base colour of pink, so using gel colours, I kneaded this into some ready made icing until the colour was even. I then rolled this out between 2 sheets of clingfilm and lay it on top smoothing with my hands to get an even finish. 
Pink cake
I wanted to pipe some wording onto the top of the cake. I've never really done complex piping before and was unsure what icing to use but I decided to give it a shot with just icing sugar and water coloured slightly purple. I wanted the icing to not be too runny that it would spread everywhere but also be thin enough to pipe evenly. 

Using a letter mould I carefully indented the icing with the letters so I had a stencil to pipe onto.
Lettered indentations
I then piped the icing on top. A few letters came out a bit spread out so I scraped them off and tried again. I was reasonably happy with my efforts but I will definitely have to research and practice this further. 
Piped lettering
I then wanted to decorate the cake with flowers creating an almost lace feel. I have loads of cutters so I rolled out some white icing and set about cutting flowers of all shapes and types. I started at one point and spread out using the little flowers to fill the gaps. It was all done by eye and what I thought looked good. I didn't want to overload the cake but I also wanted them to look like they belonged. I decided to decorate down the side of the cake as well so it looked like the cake was drapped rather than just stuck on the top.
Finished cake

Flowers cover the side as well as the top

Overall I was quite pleased with the cake. The flowers came out very nicely but the lettering could have been better. 

I am looking forward to attending a cake decorating course in September where I will be learning more techniques and improving my skills. I will keep you update with my progress and I'm sure they'll be many pictures of my practicing. 

Don't forget I'm available to make cakes to order. At the moment I'm just charging the cost of the ingredients. This cake would have cost £10. Please get in touch and we can see if I can make something to your taste and preferences.