Showing posts with label sugarcraft. Show all posts

Friday, 8 November 2013

Modelling Flowers

We learnt how to model flowers on our sugarcraft course. It's a simple process and requires just the most simple tools. Here's how we did it. 
Roll out some icing in whichever colour you want your flowers. 
Rolled icing
 Using a piping tube cut out 5 circles for each flower. 
5 circles and the ball tool. 
With a ball tool press around 2/3 of the edges thinning them out. 
Shaped petals

Take a small ball of yellow and add some edible glue to it to make it tacky. Pinch one of the circles on the thicker edge and stick this onto the ball. 

1 Petal Attached
 Repeat this with all 5 petals

Petals stuck to centre
Add another ball of yellow to the centre of the flower and prop up the petals with cling film. 

1 flower completed
 Do the same the second flower. 
Both flowers drying
 Remove the cling film and add some leaves to the bottom of the plaque. How to make the leaves can be found in the hedgehog tutorial here
Finished Flowers

Saturday, 2 November 2013

Modelling a Hedgehog

This is another model that I learnt how to create on my sugarcraft course was a hedgehog sitting on a pile of leaves. I've created this in a step by step process to show you how to do it. First thing is you need two shades of brown sugarpaste. You'll need more of the darker colour. 
Brown sugarpaste.
Using the lighter brown colour roll it into a ball using the palms of your hands. 
Ball in light brown.
Then pressing into the palm of your hand shape it into a cone and then flatten the back of the cone to form a flat edge. 
Cone
Push up the tip of the cone to shape the nose upwards. 
Cone with a up turned nose. 
Using the darker brown shape it into a ball around double the size of the head.
Dark brown ball
Shape into a oblong. 
Shaped to an oblong.
Using a ball tool press in the head edge and form a indentation that the head can fit into. You want the edges of the body to stick out around the head. 
Indented to fit in the head
 Using edible glue stick the head in the body. 
Stuck together
With a small pair of scisors make cuts all over the body starting from the bottom of the hedgehog and working your way up. These are better if they're random rather than in lines if possible. 
Spikes cut with scissors.
Using a ball tool press indentations for both the eyes and the nose. Roll out a ball in black icing and using the glue stick these into the holes. 
Eyes and nose added
For the leaves roll out some leaf colours, for this example I just used yellow but it's better to use a variety of colours. You can make new shades of colours by mixing small amounts of icing and kneading them together. It also adds to the effect to do different sizes of leaves. In the rolled out icing cut out thin strips. 
Strips for leaves
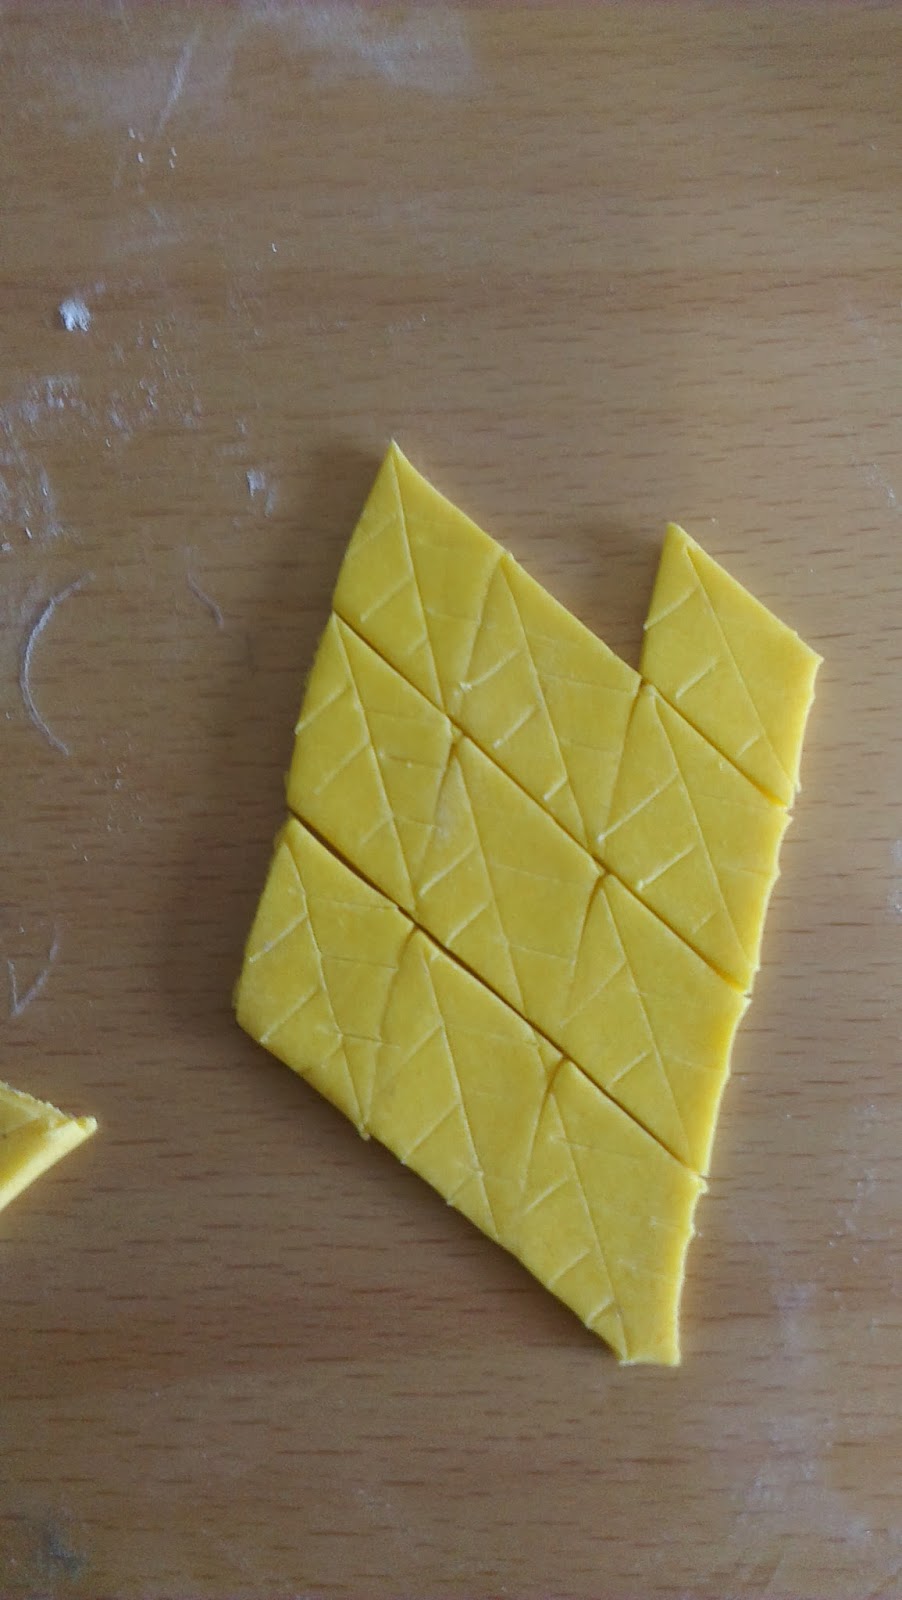
Cut across these with diagonal lines to form diamonds. 
Diamonds.
In the diamonds, using a sharp knife, mark out the leaf lines, there should be one line down the middle and then some lines out from these. Mark all the leaves in the same way. 
Leaf lines
Using glue stick these onto a plaque, don't stick them down flat but stick them folded over and in lots of angles, this makes a much more realistic leaf pile. Finally place the hedgehog on top. 
Finished hedgehogs, left has better leaves but a bit squash from travelling!! 

Tuesday, 22 October 2013

Sugarcraft Course Week 3 (I missed week 2)

Before I start the blog post for this week I want to apologise for my absence. I've been really busy lately with splitting my time between London and here and I just haven't had the chance to get everything done. I can't say much more than that but I hope that in the months to come you'll all see why I've been so busy and why this is really exciting for us both personally and also with my new business venture. 

As you know, I've been doing a sugarcraft course at Greenwich community college. This week we learnt how to pipe a basket of flowers on a covered cake board. 
Finished basket
We did this in stages, first step was to cover the board. Very straightforward. Colour your sugarpaste, roll it out and place it on the board. Cut around the edge and smooth it all over. To ensure the paste sticks to the board you can use a touch of water. 

Second step was the challenging part. Piping the basket and flowers. We did this using techniques we'd learnt in the first week. First pipe a large swirl in the centre of the board and a smaller one at the bottom. This forms the top and the bottom of the basket.Draw 2 vertical lines joining the swirls forming the edges of the basket. Between these draw so vertical lines, 3, one in the centre and one either side. Then pipe horizontal lines these need to give the effect of a weave so top line pipe to the second line, stop and then pipe from the other side of that line to the edge. Next row down pipe between the 3 central lines. Then back to piping across the 2 edge lines. Do this all the way down and then fill in the edges. 
Weave on basket

For the handle you want to pipe a large curved line from the edge of each swirl and then lots of little diagonal lines across it. 

Now we're on to the flowers. Start off with drawing some vertical green lines randomly from the basket. These will form the stems of the flowers. Using whatever colour you like pipe 6 spots in a flower formation leaving space in the middle for a yellow dot. These are your flowers, place them randomly over the green stems. Do a variety of colours. Finally for the leaves pipe lots of green spots off the stems and pull slightly as you lift, this gives a leaf shape. 
Flowers and stems
As always there's lots of improvement required but this can only be achieved with practice, which I intend on doing. I forgot to take a picture of the one I created in class so this was a quick replica so I had some photos. Next time I do it I'll try and take step by step photos. 
Next week we're doing modelling, this I will certainly need step by step photos in order to write a blog post. For now though, get practising your piping!! 

Thursday, 29 August 2013

Plans for the future..

I haven't had the chance or the funds to do quite so much baking as I'd like recently. However, I had been looking into means to further improve my skills and produce better designs. Looking in the local area I couldn't find a course that suited my needs, I wanted a course that wasn't about baking but gave me specifics in decorating the cake. I also needed a course that would be at a suitable time for babysitting. So I my mum looked in the local area. We found a course in Lewisham college, however, by the time we'd decided to go ahead the course was booked so I'd missed my chance. So I set about researching some more and came up with 2 options. 

1) A sugarcraft course in Greenwich college, this is a beginners course lasting 20 weeks, 2 hours a week, which covers the basics of different materials. It uses sugarpaste, marzipan and other bits to create flowers, models and to decorate cakes. 

2) PME professional diploma courses, I discovered this courses when I was searching around. They are courses that are for people looking to start up a home business and cover the basics of running a business as well as going into details on the various elements. There are 3 modules that together make up what they call a masters. The modules are Sugarcraft, Royal icing and piping and Flowers. Each module is a minimum of 25 hours long and typically they cost around £200. Many places run these as either an intensive 4 day course or over several weeks, 5 hours a week for 5 weeks. I was really interested in this idea as each module looks really detailed and the description sounds like what I want. However, the courses all started in September so I would be missing a week with our holiday, this would mean that I wouldn't pass. I was also worried because some of the descriptions stated this wasn't for beginners, whilst I've done some practice with the materials I haven't had any training and was worried I'd fall behind and therefore not pass. 

So in the end we came up with a plan. I'm doing the Greenwich beginners course starting at the end of September. Im still going to miss a week but it'll be just 2 hours and I'll make it up with practice. The course lasts until 27th March so throughout this time I'll be practice practice practice. Once I've completed this course I'll start looking into the diploma courses more seriously. We would need to save up lots of money but if I can get my business running then this will be worth doing. I'll aim to start the diplomas in September 2014, either as an intensive course or a weekly course. Lots of places in London carry out the course so I'll investigate what is the best option for us. It is possible to do a really intensive course which covers all 3 modules and therefore gives you the masters, but of course the cost of this is more. 

I'm looking forward to my course starting and I hope to learn many new things and hints and tips. I know I have a long way to go but I can only get better.