Showing posts with label personalise cakes. Show all posts

Monday, 16 September 2013

Flowers Cake

My sister requested a cake from me for a celebration of 30ths, we discussed what she wanted and decided to make a lemon sponge with flowers decorating the top. She only wanted a small cake so I decided to make her a 6" cake. 

Ingredients:
4 Eggs
200g Self Raising Flour
200g Butter
200g Caster Sugar
100ml Lemon Juice

Cream the butter and sugar together until light and fluffy. Add the flour and then the eggs 1 at a time. Mix until it has lightened in colour. Add the lemon juice and stir until mixed together.
Ready to go in the oven
Pour into a prepared cake tin and bake, 150oC for around 1 hour until a skewer comes out clean. Leave to cool on a wire rack. 
Cooling Cake
Make some butter icing by mixing together 250g butter and 500g icing sugar. Add around 30ml of lemon juice. The icing should taste lemony so add till it has a good kick. 

Cover the cake with butter icing and sugar paste as shown here. 

I then decided to cover the cake with lots of different coloured flowers made out of flower paste. This makes the flowers hard and also means they have more of a 3D effect rather than being flat on the cake as they are here

I cut out the flowers using cutters and then left them to dry slightly in bowls, so they dry slightly bent rather than flat. 
Flowers drying in bowls

These were then stuck on using edible glue. I made the leaves in the same way and also the 30 plaque in the middle. I used icing rolled into thin sausages to create the numbering. 

Overall I was fairly happy with the cake. I thought the flowers looked good and is something I would repeat. My cake covering is now improving but could still be better and this cake was created before I learnt those extra skills. I would also cover the board differently next time which would also create a better finish. The cake went down well with the birthday girls and I hope they would consider ordering cakes from me again. 
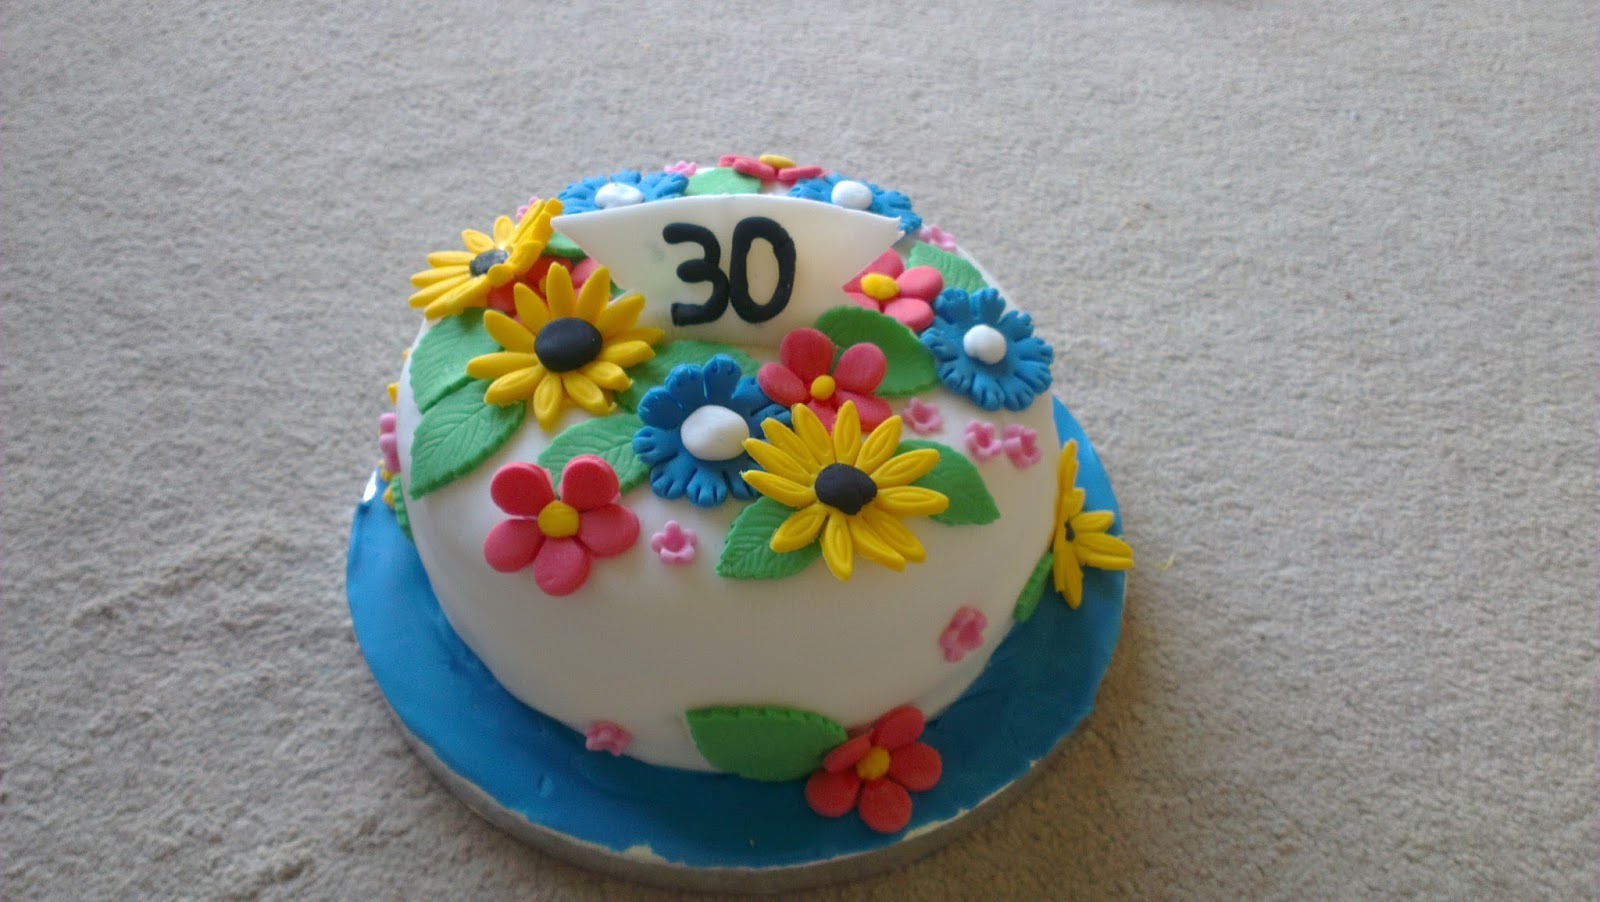
Finished Cake

If you want to order a cake from me please get in touch. I'm currently making them for the cost of just the ingredients (September 2013), this cake was £10 including box and board. Personalise a cake, do something different. 

Friday, 12 July 2013

Rectangular Sponge Cake 35cm x 24cm

For my celebration cake baking this week it wasn't about creating a great piece of artwork but working on a recipe that would work in my new cake tin and rise beautifully. The cake tin is 35cm x 24cm and is rectangular. This is the tin I use for most of my shaped cake designs so it is important to get the recipe right. 

I originally made a 6 egg recipe for the tin, however, I found that the cake was very dense and hadn't risen properly so I did a bit of research on the internet. I found out that using butter in cakes is important. I have previously used cheap soft spread and found that my mixtures where very soft, apparently this results in dense cakes. So I used proper butter for this recipe. I also looked up recipes and decided to up my egg content a little and used 8. Finally I added baking powder to my recipe to help it lift a little. 

Ingredients:
400g Butter
400g Self Raising Flour
400g Caster Sugar
1tbsp Cocoa
8 Eggs
2 tsp baking powder

Method:
Cream together the butter and sugar. Add in the flour, cocoa and baking powder (I know this breaks from the convential order but I've always done this to prevent splitting) and mix together. Add the eggs one at a time, mixing them in carefully. Pour the mixture into an already lined tin and place in the oven. I cooked this at 180oC (fan oven) for around 30 minutes and then 20minutes at 150oC. I checked the cake with a knife and it came out clean so I left it to cool on a rack. 
Cake just turned out of tin, upside down!! 
I decided to decorate the cake with orange buttercream. This was made with 300g Butter, 600g Icing sugar, 2 tsp of orange essence and 2 tbsp of milk. I cut the cake in half, yes it was risen enough to do that this time, and place it in the middle and over the top. I then decorated it with various bits I had in the cupboard including chocolate chunks, honeycomb pieces, marshmallows and chocolate sprinkles.
Finished cake
The verdict: The cake looked like the correct quantity for the tin when raw, it was around 3/4 full so room for rising. When I got it out of the oven it looked like it had risen really nicely and felt very light and fluffy when I pressed on the top. Thanks to my bake-O-glide the cake has come out of the tin beautifully and has a great height to it.
Sliced cake
The cake tasted really good, I would add a little more cocoa next time but I'm really happy with the overall recipe. This will be perfect for the Eeyore cake I'm creating next week. 

Sunday, 7 July 2013

The Future

Now that I'm back on my feet and able to do much more baking, my mind has now naturally progressed to the future. I would love to use my baking as the basis to a small business with either baked goods or creating celebration cakes. I have now added an enquires page to my blog so that people know I available for orders in the Sussex area. I'm willing to make whatever is requested and, for the time being, it'll be at the price of the ingredients. 

I need to raise my profile and do more practice,this is why I'm taking every opportunity to practice designing cakes and learning new skills. I would love to take some courses but for now I'll continue working on these things myself from books and magazines. I hope that some of you think that my cakes have potential and would be willing to buy these in the future. 

Along these lines, Gary and I have been designing logos this weekend and we'd like some input. There are 4 below and we'd like to know which is your favourite and portrays my baking business. If anyone has some better ideas, please feel free to send me that too.


Top left is 1, Top right is 2, bottom left is 3 and Bottom left is 4.