Showing posts with label lemon. Show all posts

Monday, 13 April 2015

Naked Wedding Cake

For my first wedding cake of the year I was asked to create a "naked" cake. This is a cake that isn't covered in sugarpaste so you can see the sponge layers underneath. It's typically decorated with fresh fruit and flowers. This style of cake produces a perfect rustic cake and in this case it was just perfect for the beautiful barn location. 
After the usual cake tasting the couple decided to go with vanilla, chocolate, lemon and red velvet, from the bottom up. As the cake isn't covered it's essential to have the sponge as fresh as possible to prevent them being dry. Usually the sugar paste will seal the cake in and you have a week, in this case I baked the sponge the day before. In some ways this is nice as the cake is done over a short time, however, I describe it as high stress over 2 days rather than medium stress over a week!! 
The day before I went out and purchased all the red fruit I could find, this was strawberries, raspberries, cherries, red grapes and blueberries. My first task was to wash all the fruit and leave it to dry. I didn't have much!! 
All my fruit drying
Once my sponge was made and cooled I sliced and filled each layer with butter icing. I also cut a small dip out the top so that each layer sat flush on each other, otherwise you'd see a silver board between each layer which I didn't want. I also dowelled each layer making sure that it would support the cake above.
Vanilla cake, sliced and filled with butter icing and jam. 

Remaining 3 cakes ready to go. 
Once I got to the venue my task was to assemble it all. I was relieved that the cakes all slotted on to each other beautifully and flat. I then set about putting all the fruit around the cake. I used cocktail sticks to support the larger fruits and balanced the smaller ones around. I had also previously made some sugar roses to put on the cake. So I slotted these around as well. 
Finished Cake at the venue
View of the top of the cake
I was really pleased with this cake and it turned out the best I could imagine. I drove away from the venue feeling great pride. I also got a lovely thank you card from the couple and some really lovely comments. I couldn't have asked for any more. 

If you're looking for a cake for any occasion please don't hesitate to get in touch. 

Monday, 2 February 2015

Gary's Tiger Lily Cake

For my husband's birthday this year he gave me the brief of making him an impressive cake with flowers. His favourite of those I've made so far is the Tiger Lily. So of course I used these on his cake. I decided to make a 2 tiered square cake in white decorated with piped detailing. 

My first job was to make the lilies. I made several so I could cover the cake with them. 
Tiger Lilies
Gary asked for a chocolate cake and a lemon cake, so I made these, filled them and covered them in sugarpaste and left them to settle a little. 
Covered cake and placing lilies
For the piping detailing I found a design we liked on the internet and traced this on to the cake. I them piped over these. I wasn't 100% happy with the piping but it wasn't bad for a first attempt in this style. I'll continue to practice. 

Once the cake was all dried I placed ribbons around each tier and put the lilies on the cake. 

Finished Cake
I was really pleased with the effect of this cake and thought the lilies looked stunning. I got lots of lovely compliments and will certainly be adding it to my wedding portfolio. 

Close up of side lily

Close up of top liliess


Sunday, 7 September 2014

Half and Half Wedding Cake

For my first order as an official business I was asked to make a 4 tiered wedding cake in a half and half style. This is that one side of the cake is white and the other is chocolate. The common explanation of this is that the white side is for the bride and the chocolate side is for the groom so they are often called bride and groom cakes. However, my couple described the white side as the dress and the pleating come down from the dress .
Maybe the pleat is from the dress
I was asked to make 4 different flavours of cakes, the bottom layer was a 12" rich chocolate cake filled with chocolate ganache and crumb coated in ganache. The next layer was a 10" lemon cake which was filled and coated in lemon butter icing. The 8" layer was a vanilla madiera cake covered and filled with vanilla butter icing. Finally the 6" top layer was carrot cake covered and filled in vanilla icing.

I had to get the timing of the baking correct so the cakes tasted at their best at the wedding on Saturday, so I had to bake most of the cakes on Wednesday with the exception of the vanilla which I made on Tuesday. This put quite a lot of timing pressure on me because for wedding cakes I like to double ice to get a much better finish on the cake. This means that the cake needs to cook, cool then be covered in the first layer of sugar paste. Ideally this is left overnight and then coated in another layer of sugar paste. Again ideally this is left to dry and then the cake is decorated with the piped detail. However, as you can probably guess, there wasn't enough nights to do this so I tried to spread things out as much as possible by doing things early in the morning and as late as possible to make the days longer.

Each of the cakes, for the top layer of sugar paste, was covered half in white sugar paste and half in chocolate paste, to create the half and half look. The chocolate paste is more difficult to work with so I only did 1 layer of this rather than both, it's also more expensive and the cake would have a structural problem if the bottom layer wasn't one piece.

I hand piped, using royal icing, detailing on the white side of the cake, this is the first time I've done this and I haven't yet done the diploma on this but by the end of October I expect to much better at this particular skill.

On the chocolate side I carefully covered it in chocolate ganache and left a little drip over the sides. The problem with the ganache is that it never dried solid so it got everywhere, it was very difficult working with the dark chocolate on the pure white icing.

I then dowelled up the cakes, again the first time I've done this but it was very straightforward and the cake seemed to hold very well and stuck the bottom 2 layers together and the top 2. Finally I edged the cake with some white beading and created a pleat down the joins.
Top and bottom prepared
On the top layer of the cake I attached the bride and groom topper and carefully made the pleat come right out from the dress on the bride.

I dipped some strawberries in ganache and left these to set and then the car was loaded up.
Car packed and ready to go
I had to get the cake 2 hours across country, which was rather nerve racking and made us think about future car choices!! But it made it in one piece, I then put the cake together and stuck the strawberries on.
Fully assembled cake
Overall I was fairly pleased with the cake, as always there are many things that I'd like to improve on but for a first attempt I thought it came out really well. There are things I've learnt and things I'd change but all I can hope is that it was perfect for the bride and groom.
Chocolate Side
White Side

Friday, 14 March 2014

3 Tiered Flower Cake

For my sister's 30th birthday I decided to make a 3 tiered cake with flowers on it. She asked me to make lemon, chocolate and ginger cake. So I did. 

8" Lemon Cake
400g Butter
400g Self Raising Flour
400g Caster Sugar
8 Eggs
2tbsp Lemon Juice

6" Chocolate Cake
160g Butter
160g Plain Chocolate
25ml Coffee
1tsp Vanilla Essence
160g Plain Flour
1tsp baking powder
1tsp bicarbonate
240g Light soft brown sugar
3 eggs
150ml Soured Cream

4" Ginger Cake
50g Butter
50g Caster Sugar
50g Self Raising Flour
1tsp Baking Powder
1tsp Ginger
1 Egg
1tsp Golden Syrup

Once all of the cakes were baked I left them to cool and then cut them, using cocktail sticks as guides, at an angle. If I did this again I would cut the cakes at a much more of an angle. I then covered each of the cakes in butter icing and then sugar paste. 

I didn't have dowels, next time I'd use them, so I placed the cakes on boards and then put them on top of each other. The cakes sunk slightly but managed to hold pretty well considering there was no support. 

I cut out flowers and placed them on the side of the cake. I also rolled out a 30 for the top of the cake. Finally I made a Gerbera flower for the side of the cake.  
Gerbera Flower
Slightly Wonky Cake
Balanced Layers
Overall, considering the time restraints and lack of certain items, I was quite pleased with how this cake turned out. If I was to make it again I'd change certain elements and give myself more time to focus on it. I hope that my sister liked the cake and enjoyed the left overs. 

Monday, 16 September 2013

Flowers Cake

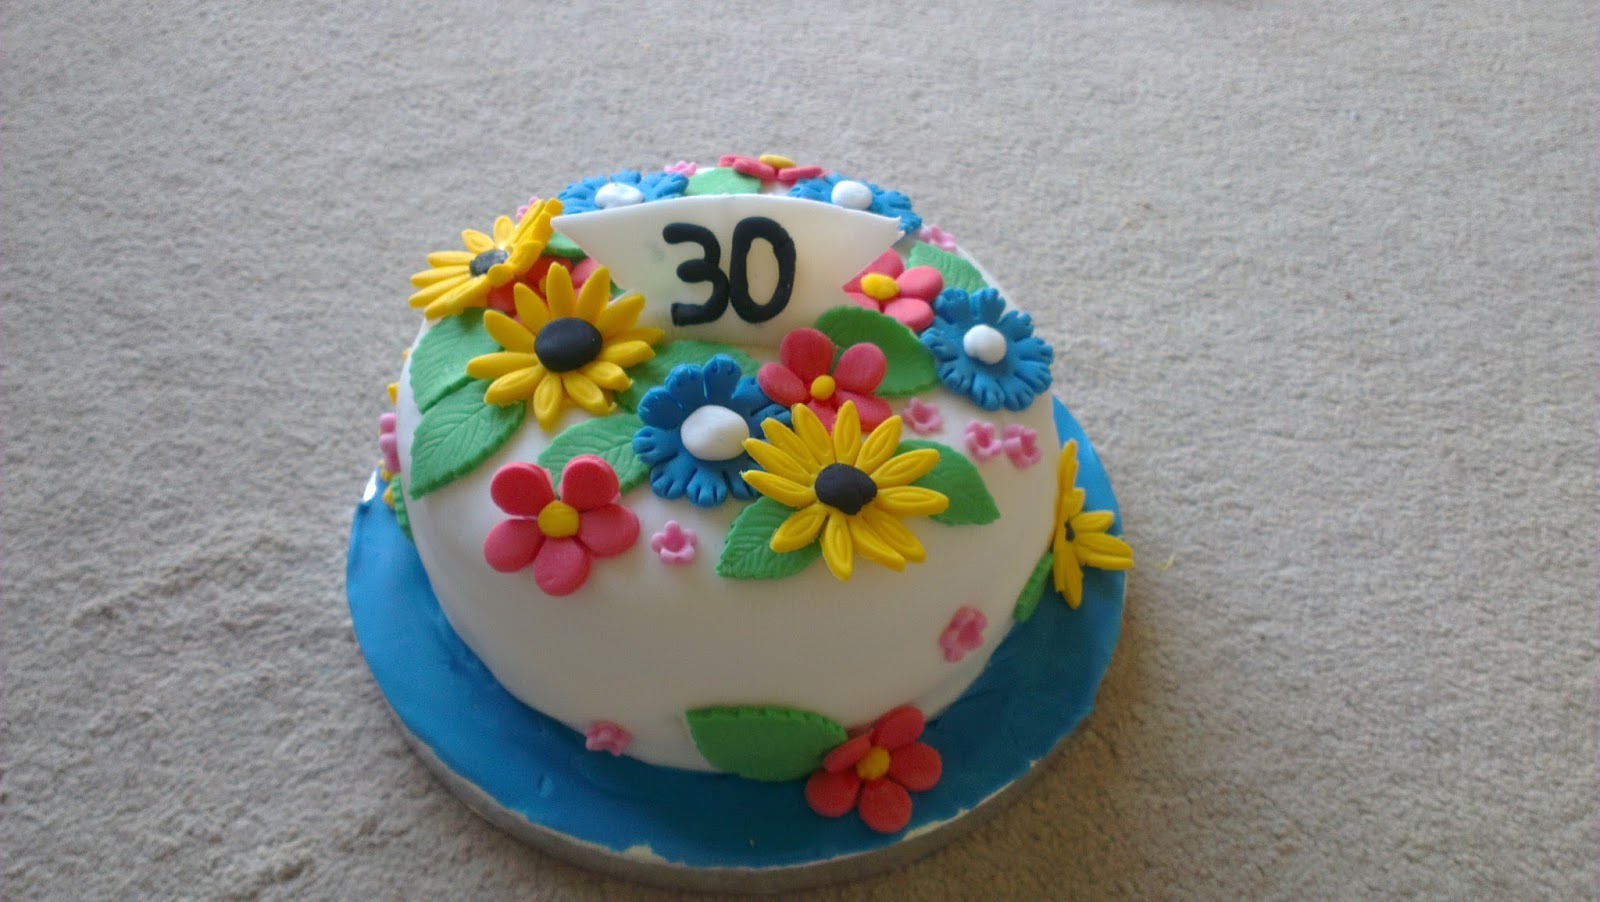
My sister requested a cake from me for a celebration of 30ths, we discussed what she wanted and decided to make a lemon sponge with flowers decorating the top. She only wanted a small cake so I decided to make her a 6" cake. 

Ingredients:
4 Eggs
200g Self Raising Flour
200g Butter
200g Caster Sugar
100ml Lemon Juice

Cream the butter and sugar together until light and fluffy. Add the flour and then the eggs 1 at a time. Mix until it has lightened in colour. Add the lemon juice and stir until mixed together.
Ready to go in the oven
Pour into a prepared cake tin and bake, 150oC for around 1 hour until a skewer comes out clean. Leave to cool on a wire rack. 
Cooling Cake
Make some butter icing by mixing together 250g butter and 500g icing sugar. Add around 30ml of lemon juice. The icing should taste lemony so add till it has a good kick. 

Cover the cake with butter icing and sugar paste as shown here. 

I then decided to cover the cake with lots of different coloured flowers made out of flower paste. This makes the flowers hard and also means they have more of a 3D effect rather than being flat on the cake as they are here

I cut out the flowers using cutters and then left them to dry slightly in bowls, so they dry slightly bent rather than flat. 
Flowers drying in bowls

These were then stuck on using edible glue. I made the leaves in the same way and also the 30 plaque in the middle. I used icing rolled into thin sausages to create the numbering. 

Overall I was fairly happy with the cake. I thought the flowers looked good and is something I would repeat. My cake covering is now improving but could still be better and this cake was created before I learnt those extra skills. I would also cover the board differently next time which would also create a better finish. The cake went down well with the birthday girls and I hope they would consider ordering cakes from me again. 
Finished Cake

If you want to order a cake from me please get in touch. I'm currently making them for the cost of just the ingredients (September 2013), this cake was £10 including box and board. Personalise a cake, do something different. 

Wednesday, 4 September 2013

Lemon Custard Tarts

After attempting a previous lemon custard tart recipe, seen here, and not thinking it was amazing I decided to try making one of my own combining a few recipes and experimenting a little. 

The first step was to decide what type of pastry I wanted to use. I've had really good comments about my puff pastry but it's quite time consuming so I wasn't sure I wanted to spend the day making it. The other option was sweet shortcrust pastry. I decided that I would do puff this time because I wanted the recipe to be as good as it could be. The recipe for the pastry can be found here. Of course you can use shopbought pastry as well, either puff or shortcrust. 

I rolled out the pastry and, using a 9cm cutter, cut out circles. The custard recipe will make around 12 tarts. These were placed in a muffin tin, covered in greaseproof paper and filled with beans. I baked these, blind, for 15minutes. 180oC. 

Meanwhile I made the custard filling. I decided to do this similar to a previous recipe as that worked really well. For vanilla custard tarts with a chocolate swirl look here. I needed to be careful that the mixture didn't curdle, lemon and milk is not usually a good mix. 

For my first attempt, which didn't work, I tried adding lemon juice and zest in with the milk and heating it. I then strained it and thickened to custard. This mixture seperated and tasted awful so I won't be attempting that again!! 

My second attempt, which did work, was the method I settled on:

Ingredients: 
90g Caster Sugar
3 Egg Yolks
1 tbsp cornflour
250ml Semi skimmed milk
Zest of 2 lemons

Place the zest and the milk in a saucepan and heat up until the milk is just boiling. 

Mix together the sugar, egg and cornflour until a smooth paste. 

Strain the milk through a sieve, to remove all the lemon zest, and place it back in the saucepan. 

Add the paste and whisk, heat gently always mixing. This will start to thicken up quite quickly, as soon as it does remove it from the heat and allow to cool slightly. 
Lemon Custard
Once your pastry cases are cool, remove the paper and beans. Fill with the custard mixture. Place back in the oven, 180oC, for 10minutes. 
Tarts in the muffin tin
Once done allow to cool and enjoy!! 
Ready to eat!

The verdict: I really enjoyed these tarts, and it's not just because I made them up!! I thought the lemon was strong enough to have a fresh flavour but not so strong that it was over powering and sharp. The tarts had a lovely sweetness to them. I could happily have eaten the whole batch. I'm still not overly keen on pastry so for me I would probably make a big tart so there's a large custard to pastry ratio, however, I'm sure others would disagree with me on that one. I give the recipe 10/10! Yummy!! 

Wednesday, 28 August 2013

Lemon Custard Tart

My custard tarts have been really popular at Gary's work so I decided to try this variation that I found in Annie Bell's Baking Bible. 

The recipe was different from what I was expecting. I thought I'd make a custard and make it lemony, however, this was a liquid until baked in the oven. I guess a baked custard. Anyway, the recipe was again very easy, as I've come to expect from Annie Bell's recipes. 

First step was to make the pastry, this was made by combining all the ingredients in the food processer and then chilling for an hour or so. The pastry is the pressed into a cake tin. This bit was quite challenging because the case needs to be 6cm high but I got there in the end.

Pastry Case
The case was then baked blind and left to cool. 

The custard was made by combining all the ingredients and then pouring into the pastry shell.
Ready to go in the oven
This was then cooked for around 1.30hours and left to cool.

Baked Custard
The verdict: This recipe has produced mixed verdicts. Both Gary and I thought that the tart was nice, however, in places it was very eggy. I think it seperated in the oven and so some areas tasted of just egg whereas others had been nicely combined and tasted really good. The lemon was a nice flavour, not too strong, but no one knew that it had orange in it. My sister and mum thought that it was really nice and happily demolished the whole tart over the weekend. I would give the tart 7/10.
Finished pie and eaten!!

Tuesday, 27 August 2013

Angel Food Cake

Along with most of the country, I've been very excited by the arrival of the Great British Bake Off 2013 back on our screens. I've decided to try my hand at the technical challenges so each week I'll be searching out the recipes and giving them ago if at all practical. Week 1 we saw the cake week, this series the technical bake was Mary Berry's Angel Food Cake. One of my friends helpfully emailed me the recipe for this while I was waiting for it to go online. Thank you. You can now find the recipe here

This cake is different because it has no fat. Most of the structure comes from egg whites which have been well whisked and hold all of the air. I used my mixer for this, it's the first time I've used the balloon whisk attachments as I've never had enough mixture. This recipe called for 10 egg whites so I was delighted that this was certainly enough. The mixer worked really well and I got lovely peaks very quickly.
Whisked Egg Whites
The recipe calls for a slight whisking and then adding lemon, cream of tartar and some salt. I've never used cream of tartar but on reading the packet I could see why it was used. It helps the whites hold their structure and increases volume. The caster sugar is then added spoon by spoon. The final step is to fold in the flour, carefully, maintaining all the air in the egg whites. 
Flour Folded in
I didn't have the correct tin this time so I used a standard 8" tin. I carefully spooned all the mixture into this. It reached the rim of the tin so I hoped it wouldn't rise too much!! The cake rose the perfect amount just about holding inside the tin. 
Just about fits in the tin!!
Once cooked I turned my tin upside down and left it on a cooling rack. Since I wasn't using the right tin I didn't have the proper feet and my cake was right over the rim but it seemed to be ok, I think. 
Upside Down Cake
The recipe also calls for making lemon curd, with all the left over egg yolks. So I quickly whipped up a batch of this. It's very easy and just requires placing all the ingredients over a low heat and stirring until it's thickened. 

Making the Lemon Curd
Once cool I covered the cake in whipped up cream and drizzled some lemon curd onto it which had some passionfruit seeds stirred in. 
Ready to Eat
The verdict: I really enjoyed this cake, it was lovely and light and the lemon was so refreshing and cut through perfectly. I'm not sure what the passionfruit added and next time I'd omit these. This is a cake that I'd happily eat more slices of and probably will before it heads off to Gary's work tomorrow. Certainly a cake I'd love to make again and would try other fruity flavours. I would also like to try it in the proper tin. I didn't feel there was anything wrong with the bake this time but I'd like to compare and do it properly. Difficult to know what it should look like but I think it compared to those on GBBO, possibly a little squashed due to using the wrong tin upside down. I'd give this 9/10, that extra mark could be gained by removing the passionfruit and trying with the proper tin. 

Sunday, 7 April 2013

Lemon Tarts

I wanted a balance with my chocolate tarts and decided to create this by making some lemon tarts. This recipe was from the book Muffins, Scones and Teatime Treats

I made the pastry the day before to give myself less to do, the recipe doesn't state this is necessary stating it requires only 20mins in the fridge. 

The pastry is made by combining plain flour, salt, butter, caster sugar, lemon rind, egg yolk and water together. Start with just crumbling the flour and butter and then add the remaining ingredients together. I then wrapped this in cling film and placed it in the fridge overnight along with the other varieties of pastry I'd made that day. 
Pastry wrapped and in the fridge.
When we were ready to start the following day I commisioned my mum to make the pastry cases while I made the filing. To do this she carefully rolled out the pastry and cut them using 8cm round cutters. This was the right size to fit in a cupcake tin, which is what we used to bake them. She found that the pastry easily made 24 cases, in fact we ended up making 30 due to having left over pastry and filling. 

The pastry cases were pricked with a folk and then baked for 10mins, unusually they did only require this length of time to bake and therefore the timing was correct. 

To make the filling I combined cream cheese, sugar and egg yolks together until smooth. I then added lemon juice and condensed milk beating this until the whole mixture was well combined. 
Smooth, light mixture ready to be spooned into cases.
I filled the cases by adding 2 teaspoons of mixture to each one and then these were baked in the oven. The recipe stated they should be baked for 5 mins but we started off with 10 and this seemed to be the perfect length of time. 

These were served on a 2 tiered cake stand.
Lemon tarts ready to be eaten
Verdict: I gave the tarts 7/10, I thought that the filling was really nice and light, however, it didn't taste strongly enough of lemon. The first taste I got was condensed milk and then the lingering after taste was lemon. I wanted to be hit a little more strongly. Gary also gave the tarts 7/10 stating that they were nice and refreshing, however, more lemon was needed. I also got my mum to guest mark these and she gave them 8/10 stating that they were creamy and smooth, her favourite so far but they were nothing special. Overall these tarts received a mark of 22/10, they were OK but definitely didn't create a wow. 

I have to apologise for the lack of pictures of this recipe, I forgot to take many as I was carrying out the various steps!! 

Sunday, 31 March 2013

Afternoon Tea Baby Shower

For my "baby shower" I decided that I wanted to invite all of the female members of our family over for afternoon tea and some games. I wanted it to be a relaxed environment giving people a chance to catch up and nibble on some good food. 

I've spent time planning and choosing some yummy recipes for the gathering. I knew there'd be loads of food for the number of people but I wanted there to be lots of choice and plenty of each item so should something be more popular there was enough. I hadn't made any of the recipes before, which was part of the fun, so everything was new and exciting. It took 12 hours of baking but we ended up with a great feast of food and I think it was all very nice. I will be making posts of all of the individual baked items over the coming weeks so more detail will follow, however, I'll add in a little teaser that one of the items got 30/30!! 

All the goodies ready to be eaten
To plan and pick all the recipes I did some google searches for afternoon tea recipes, I found that the BBC food website was really helpful and gave me plenty of ideas, in fact, most of the recipes I ended up using came from there and they worked well. 

So let's start at the beginning, my first thoughts went to what savoury items we should include. I wanted a traditional tea so we couldn't have any of the pizza or crisps ideas that my mum suggested!! So we had to think a little harder. Of course sandwiches were essential but what flavours? After some thought we decided to keep it simple and go with some tried and tested fillings:
  • Tuna and Sweetcorn
  • Ham
  • Cheese and tomato
  • Smoked salmon and cream cheese
We made all the bread fresh so on Friday, using a bread machine borrowed from my mum, which was baking away producing 3 loaves for us. I cut off the crusts and made them into neat little squares, originally I was thinking of making sticks but this would have resulted in tiny sandwiches so it wasn't worth it. 
Tuna and Sweetcorn

Ham on the left and Salmon on the right
So to go with the sandwiches I wanted a couple of other items. Years ago I remembered making some mini quiches that my mum liked, I didn't still have the recipe and I haven't made them since but I thought they would be a good addition. To go with these we looked through the recipe books and chose parmesan and sunflower biscuits. 

All afternoon teas have to have scones so of course these were a necessity along with some kind of fruity cake. We decided on a a fruit tea loaf which could be neatly sliced up. 

Finally the cakes element of the meal, and this is where we had the most fun, I looked through the lists and my "short" list ended up being quite long :-\ so then came the process of narrowing it all down. I wanted a balance of fruits and chocolate so we didn't have too many similar items but I also wanted things that could be made in bite size pieces. So we finally narrowed it down to:
  • Chocolate tarts
  • Lemon tarts
  • Double Chocolate Loaf Cake
  • Bakewell Cheesecake
  • Pineapple and Coconut Cupcakes
I hoped this would create a nice mixture of items and have something to suit everyone. 

The food went down very well and I only received nice comments on it all, as I said, I will be writing about each item and marking them all separately with links to the recipes. There was lots of food left over, as expected, so my guests also got to leave with goody bags of their favourite items. Poor Nanna had 2 bags of salmon sandwiches as no one else wanted those!! 

Now a quick diversion off of baking to show some of the other things we also had going on. Last minute this week we decided that some bunting might look nice around the room, so my mum rushed out on Wednesday to try and find some that we could personalise. We ended up with 3!! 

Firstly the fabric bunting, we got a fabric one from Lakeland, which was a lovely mix of colours in checks and strips. To personalise this she purchased some stickers and iron on pictures to put on each flag. She chose some baby designs and some tea party designs along with Mia's name (our expected baby). 
Fabric Bunting in room
She also got some paper bunting as back up but we decided to put these up as well. The first was a flowery design and the second had bears, horses and solid colours to mix it up. 
Flowery Bunting

Bear and Rocking Horse Bunting
These made a nice difference to the room and made it feel a little more partyish!! 

Finally I'll finish with a big thank to my mum, who worked SO hard to make my vision come to life; my husband, who was lumbered with all the cleaning and tidying up; and to my guests who came with wonderful gifts, lots of chatter and provided fun. 

Overall a great day was had, hopefully, by all. :). 

Monday, 18 February 2013

Valentine's Day Dinner

As our wedding anniversary is so close to Valentine's day, and we don't really celebrate Valentine's, we decided to have a special home cooked meal. 

Over a few weeks I searched for recipes and got my husband to choose which he liked best. For starter we decided to go with something we've made before and both like, Bruschetta. 

We do this very simply, toast some ciabatta, usually this would be spread with garlic butter but this time we just used plain butter. We sliced some tomatoes and red onion and mixed these together. These were placed on top of the bread and then we used balsamic vinegar poured onto the plate. 
Bruschetta
For the main we chose something I've never made before, duck breasts, Gary chose this recipe, Five spice duck breast. It was very simple and involved frying the breast in spices and the combining this with soy sauce, honey and bok choy. We found this slightly more challenging because we didn't really know what we were doing. 
Main, five spice duck. 
I served the recipe with mashed potato so it would fill us up a little more. This was very nice but parts of the duck were too rare, so could have done with being cooked slightly more, and the bok choy was too chewy. I really enjoyed the bits of duck that were cooked enough. 

For dessert I chose a lemon dessert, I'm rather enjoying citrus at the moment so this hit the spot. Lemon self-saucing dessert. This is a very easy dessert, and was delicious. Gary gave this 10/10. I served it with custard, so unfortunately you can't see much in the photo. All I can say is it was REALLY nice and definitely worth trying!! 
Dessert - Lemon self-saucing dessert
The meal was a really nice combination with improving flavours in each course, we enjoyed the experiment. Whilst we probably won't cook the duck again, due to ingredient cost vs flavour, we will adjust this recipe for use with chicken and I think Gary would definitely like me to cook the dessert again.